PEBL ELECTRIC PEDAL ASSIST VELOTRIKE

pebl-velotrike-red

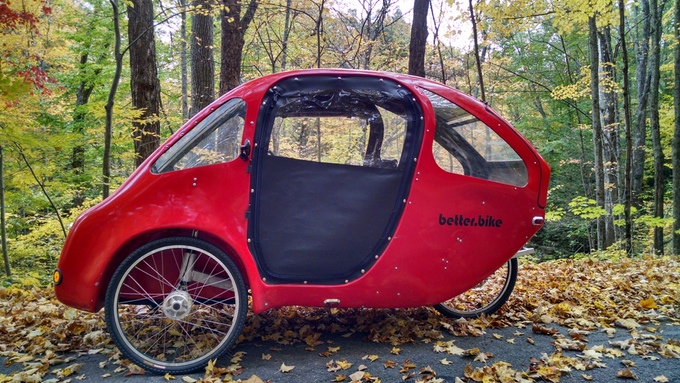
They just keep popping up … velocars, that is. The PEBL is a product of  New England here in the U.S. It is an enclosed shell electric pedal assist vehicle. And as you can see it looks very similar to the ELF velocar. The starting price according to their website is $5950.

They met their kickstarter goal which is a good thing. They expect to be shipping by January 2017.  They have a blog which you might enjoy reading.

“The PEBL is a new and exciting type of zero emissions vehicle that combines the comfort and utility of a small car with the benefits of a bike. Designed for four season use, the PEBL is a three wheeled, fully enclosed bike that utilizes a combination of pedal and electric drive with a body made from plants. You can pedal as much or as little as you want all year round. It is the world’s most comfortable and functional velomobile, bridging the gap between a car and a bike.”
Base specs:

6061 corrosion resistant aluminum frame with rear suspension
Hemp & soy composite body
Vinyl doors with zip up windows
Full flooring with removable heel well inserts
Impact resistant polycarbonate windows
Programable 48v 750W power system
16ah Lithium Ion battery
Fully adjustable cockpit (pedals, seat, handlebars)
20mph top speed
25 mile range (without pedaling)
5 Amp integrated charger (plugs into any standard wall outlet)
Full street lighting (headlights, brake lights, turn signals, running lights)
Reverse
Cruise control
Regenerative braking
Horn
USB charging port
Keyed power switch
Sturmey Archer 8 speed rear hub
Sturmey Archer 90mm drum break front hubs
Avid BB7 rear 200mm disk brake
Oversized 2.3″ Kenda K-Rad tires on Alex DM 24 alloy rims and heavy duty spokes
6 cubic feet of rear storage
Transformable passenger seat for 4 cubic feet more rear storage
6 Standard Colors: red, orange, yellow, blue, green, white
Dimensions:

Length: 99″
Height: 54″
Width: 44″
Track width: 42″
Weight: 195 lbs
Options:

600 watt heater
Battery warmer wtih dashboard mounted temp sensor
Additional USB/12 volt power ports
110W roof top solar panel
Up to 3 more additional 16ah batteries for 100+ mile range per charge
Interior lighting
Wider tire and wheel options
Custom coloring

I am sure that is a niche for such vehicles. As many of them as there are being manufactured or trying to get to market it will be interesting to see which ones survive. One thing I have notice about all of these which is a real turn off for me is the fact that the “windows” get all messed up and visibility out thru them gets really bad. I like good visibility when I ride so this would be a serious problem for me.

pebl-velotrike-orange

pebl-velotrike-handlebars

FREE GIFT awaits you!

IMPROVISING IN ORDER TO PEDAL AFTER KNEE JOINT REPLACEMENT

recumbent-bike-on-indoor-trainer

It may not be a tadpole trike, but it is a recumbent and for now I am using it as part of my “rehab” after total knee joint replacement. It is said that pedaling is one of the very best things one can do for recovering from total knee joint replacement. However, just getting on and off of it is a bit challenging … getting my leg up and over the frame … more so than pedaling it. I am managing it though. Once I have myself straddling the frame I am “in like Flint”.  That being said, in order to pedal I need to place my heel of my foot on the pedal so that I am moving my knee thru a smaller circle. I am slowly inching my foot backwards on the pedal as I spend time pedaling, but I only have to move it a short distance before I start “feeling” the discomfort it brings on.

The recumbent stationary bike in the  rehab facility where I go is set up with the crank arms quite short and I can spin them easily … even at 100 rpm cadence. I usually only ride my tadpole trike at about 60 rpm. I really need the crankarm shorteners, but alas, my wife says no as she doesn’t want me to spend the money right now. So I am improvising by placing my heel on the pedal. Of course, when I get the other knee joint replaced in two weeks without the crankarm shorteners I will have to place both heels on the pedals. BTW, one might think that pedaling with one foot properly placed with the ball of the foot on the pedal while the other foot has the heel on the pedal would be awkward and weird, but actually it is not a problem at all. It feels rather normal and natural to me. Of course, I would much prefer to pedal with both of my feet positioned normally.

heel-on-pedal-2

Hmmm, maybe I can sell something to get the money to buy the crankarm shorteners. They would be the “cat’s meow”. (For those who don’t understand that term here is a definition/explanation: “The cat’s meow” is an expression referring to something that is considered outstanding.”) I am not a fan of pedaling with my heels, but a guy’s gotta do what a guy’s gotta do.

short-crankarms-2

Yep, you are looking at the cat’s meow!

While others …  KEEP ON TRIKIN’  I just want to … KEEP ON PEDALIN’ … until I can join you.  🙂

FREE GIFT awaits you!

10/28/2016 Update: I have been able to slowly work at sliding my foot back on the pedal and continue to pedal until I was able to place my foot the same as my other foot. However, every time I get on the bike I have to start all over with my heel on the pedal. At least this progress is encouraging even if it doesn’t last at this point in time. BTW, I am now able to get on and off of the bike much easier that I could at first.

FREE GIFT awaits you!

PEDALING WITH KNEE PAIN

As many of you know I am in the slow painful process of recovering from total knee joint replacement. I am 4 weeks post surgery as I type this. All in all I am doing very good. I was walking without a walker in just 2 weeks time. I was driving motor vehicles in 3 weeks time. One thing I have been aware of and have even written about before is the use of shorter crankarms. One of the options to this is crankarm shorteners which bolt onto your existing crankarms. They make really good sense to me as they offer various length settings. With this you can change from one setting to another as needed and as your range of motion improves. And if you ever get back to where you no longer need them you simply uninstall them and go back to your original crankarms.

I am currently going thru rehab therapy and sometimes ride a stationary recumbent exercise bike. The rehab facility has two of these bikes, but I can only ride one of them. I looked at both of them and noticed that the difference is the length of the crankarms. The one I can ride has adjustable crankarms and it is setup with shortest available length. I pedaled it yesterday at 100 rpm for a short time. It felt really good to pedal it. Interestingly the physical therapists told me that very rarely can any knee joint replacement patient ride the other bike.

So anyway I plan on buying a set of crankarm shorteners to help me pedal. Hey, if you have knee joint issues and limited range of motion using shorter crankarms might be “just what the doctor ordered” for you. They are not cheap however. I was surprised and disappointed when I looked them up online. The best price I was able to find was about $115 with shipping thru Amazon. They are a different brand than the ones in this video. (I have noticed that the prices seem to change almost daily. The best deals I have found are usually on Ebay.) I had not yet come across these Ortho Pedals which sell for $89 each or $149 per set. Most of the ones I found were far more expensive … $130 and up. Ortho Pedal’s FAQ. Ortho Pedal’s warranty.

BTW, my second knee joint replacement is scheduled for Nov. 10th … just two weeks away. Oh boy! I am hoping to be burning up the asphalt come next spring.  Don’t get in my way! 🙂

FREE GIFT awaits you!

HOW SCHWALBE TIRES & INNER TUBES ARE MADE

would venture to say that probably several of you have seen this video before, but for those who have not I think you will find it interesting. Most tadpole trikes come with some model of Schwalbe tires installed from the factory. There is a reason for that. Schwalbe makes some of the very best bicycle tires in the entirety of the world. Without further ado here is the video:

FREE GIFT awaits you!

ALUMINUM BICYCLE RIMS – HOW THEY ARE MADE

Yet one more of these videos showing how bicycle components are made. This time it is aluminum wheels. Most of our trikes come with aluminum wheels so let’s take a look at how they are made.

FREE GIFT awaits you!

FIRST ATTEMPT AT RIDING MY TRIKE SINCE KNEE JOINT REPLACEMENT

my-right-leg-incision-reduced

As some of you know I recently underwent total knee joint replacement. That, of course, means that I haven’t been doing any riding. Naturally I really miss it and am anxious to resume riding ASAP. My doctor had told me I ‘might’ be able to ride by 3 weeks post surgery. It has been 2 and a half weeks thus far. Well, I decided to try it. After all I rode the recumbent exercise bike in outpatient rehab last Friday and did ok with that. So this afternoon I decided to give it a go. My wife had gone to work so there was no one here to try to stop me. 🙂 I got my trike out and got it all ready to ride (lights turned on and safety flags in place). My main concern was getting back up out of the seat as I expected that to be problematic. It turned out that should have been the least of my concerns. Sitting down onto the seat was more challenging than I thought it would be, but I made it ok. It was a bit challenging to get my recovering leg into position and my foot resting properly on the pedal, but again I accomplished it and was “ready to go”. As things turned out what I expected to probably be the easiest part of all this turned out to be the most difficult … pedaling. I took off rolling down the driveway toward the street and as I made my first revolution of the crankset and started bringing my new knee joint back toward me I quickly discovered that it caused excruciating pain.

knee-pain

(No, this is not a picture of my knee.)

Normally with the heel slings I use I am able to lift my feet off of the pedals easily and quickly, but with my bum leg I could not do so. The pain just continued. Finally I got my foot off of the pedal and because of all the pain and weakness in the knee joint area I could not hold my foot up off of the ground like I normally can so my shoe made contact with the ground as the trike was still rolling (I did not want to stop in the middle of the street).

leg-suck-illustration

That resulted in more pain and I nearly experienced “leg suck“. I somehow managed to avoid that and made it over to the opposite side of the street by the curb where I sat for a few minutes trying to recover. Not knowing how I was going to do trying to get up out of the seat I was concerned that I might have to sit there until I can flag down some help from a passerby. Fortunately when I made the attempt to get up out of the seat I found it to be extremely easy. Upon getting up I started walking my trike back over across the street and up the driveway. I put my trike away and called it quits … realizing that I am not ready for “prime time”. I think the seat vs. pedal height position comes into play here. I think I could do much better pedaling in a traditional riding position such as I had when I rode the recumbent exercise bike in rehab last Friday. It looks like I am going to have to get the 2 wheel recumbent bike out to ride for now as the riding position is quite similar to the exercise bike in rehab. Although it hurt like crazy it probably did me good stretching in bending like that. The outside of my knee joint has healed up nicely and looks pretty good, but it is another story internally. The knee joint remains inflamed, tight, stiff and very sore. It is still generating a lot of heat. And to think that in 3 and a half weeks I am going to have the other knee joint replaced. I don’t think I will be doing much trike riding until next Spring.

chuck-the-stickman

(No, this is not a picture of me. That is my trike in the background though. The picture is of a friend who walked the local trails for many many years until he had to give it up recently for health reasons.)

At least now I will hopefully be able to walk on the trails thru the winter months. That is something I haven’t been able to do for many many years and I really miss it. Anyway, as loud as I must have yelled today I figured you might have heard me. 🙂  For those of you who can …

KEEP ON TRIKIN’

and I will join you when I can

FREE GIFT awaits you!

GEAR INCHES AND MORE

The gearing we have on our trikes is a most signifcant thing. Some trikes only have one gear, some have 3, 5, 8, 12, 14, 21, 24, 27, 30, 81, 90 or some other number which is obtained by means of a multiple speed internal hub in addition to the derailleur system. Of course, for a trike with only one gear there is not much involved in figuring out the “gear inches”. What are gear inches, you ask?  Actually it is not all that simple to answer definitively. There are variables which complicate things. One such variable which seldom is discussed or taken into consideration is the length of the crankarms. Usually it is just the various sprocket sizes (number of teeth) and drive tire diameter and circumference measurements that are used in the calculation. According to Wikipedia the definition of gear inches is:  “the diameter in inches of the drive wheel of a penny-farthing bicycle with equivalent gearing.”

The lower the low number is the lower the gearing is which means one can more easily climb hills. The higher the high number is the higher the gearing which means a faster top speed is obtainable. So the ideal gear inches would be very low to very high. On a derailleur system the rear derailleur is only capable of handling so much of a range. I have an article on this subject HERE. The only way I know of to get around this limiting factor is by employing internal hubs in addition to the derailleur/multiple sprocket system. The internal hubs can be in the rear wheel hub or in the crankset or both. One can greatly increase the gear inch range by using these internal hubs. You can lower the low number and raise the high number. Here are examples of internal drives:

3-speed-hub-with-cassettes patterson-drive

3 speed Sturmey Archer rear hub          2 speed Patterson Drive in crankset

For those who want to figure it all out for themselves here are some formulas to use:

Gear-Inches = Chain Ring Teeth X Tire Diameter Divided by Rear Cassette Sprocket Teeth

Distance traveled per Crank Revolution = Chain Ring Teeth X Tire Circumference Divided by Rear Cassette Sprocket Teeth

And lastly … MPH at 60 RPM = 0.0568182 X Distance per Crank Revolution

FREE GIFT awaits you!

INNER TUBES – HOW THEY ARE MADE

don’t know about others, but I find it interesting watching these videos which show how various things are made. I tried to find a video about bicycle inner tubes, but the only one I found is motorcycle inner tubes. But hey, there isn’t much difference other than size. Here is the video:

FREE GIFT awaits you!