A well equipped bike shop has lots of bike tools available to use. It would be nice to have all these tools available to use when we are out riding, but obviously that would be very impractical. Never the less, it is a good idea to carry “essential tools” along so we can handle most things that might happen.
I bet very few of us do however. And many riders carry multi-tools which in my opinion and experience are to be compared to teats on a boar. They are just one notch up from being totally worthless.
They are okay for some things but for many things they won’t work. And what do you do if you need to use two tools at the same time and they are both on the multi-tool? That is a common occurrence. No, I am not a fan of multi-tools. I have a few but like I said, I find them very impractical and next to worthless for most tasks.
That means that for me I choose independent individual tools. I do carry more tools along with me than most people do. Yes, it is extra weight, but that is okay. I would rather have what I need than be broken down somewhere and not be able to remedy the situation for lack of a tool needed.
I keep my tools in a canvas bag I bought at Harbor Freight Tools. I keep the canvas bag in one of my panniers. I also have more tools in a smaller bag which just fits in the pocket in the back of my Catrike seat.
Tools I carry are common place … flat blade screwdrivers, Phillips head screwdrivers, 4 inch, 8 inch and 12 inch adjustable wrenches, medium size ball peen hammer, metric open/box end wrenches, rat tail and flat files, needle nose pliers, side cutters, vice grips, slip joint pliers (ChannelLock type), set of metric Allen wrenches, chain cutter, missing link chain pliers, spoke wrench, pedal wrench, Torx head screwdrivers for disc brake adjustment and brake rotor removal, set of 3 plastic tire tools, telescoping antenna used to set toe in and possibly a few more tools that are not coming to mind right now.
Along with tools I also carry some common spare parts such as inner tubes, chain repair links, several connected links (sections of chain), a small assortment of bolts, nuts and washers, steel wire, a small assortment of plastic zip ties, extra Schrader valves, spare spokes, chain oil, wet wipes, vinyl gloves, a few clean shop towels and no doubt some other things that are not coming to mind right now.
No, I don’t carry any inner tube patching supplies as I don’t patch inner tubes. I have had too many patches fail so I don’t mess with patching them. Truthfully I have not had a flat for many years. I have been using puncture resistant tires for many years now and I just don’t get flats anymore.
I carry a small bicycle tire pump with me as well as a battery powered air pump.
That is about all that comes to mind about this subject. With all of this I carry along with me I not only can take care of my own needs but I can help other cyclists in need when I come upon them. I definitely believe in being prepared. How about you?
KEEP ON TRIKIN’
You are invited to come join the Tadpole Rider Facebook Group. Please note that in order to join you must first answer the three membership vetting questions.
Why wish upon a star when you can talk to the One (Jesus) Who created them?
TODAY IS THE OLDEST YOU’VE EVER BEEN, YET THE YOUNGEST YOU’LL EVER BE SO – ENJOY THIS DAY WHILE IT LASTS FOR THIS IS A DAY THE LORD HAS MADE! REJOICE AND BE GLAD IN IT!
What is more important to you … having your trike look great with nothing much added to it much like it came from the factory … or … adding a bunch of stuff to it which distracts from its appearance but is quite useful and practical to have available? Now I ask you? I see tadpole riders all the time riding trikes that appear to have nothing extra on them. They must be dependent on others if something goes wrong as they are not equipped to handle it themselves.
I must admit I have been asked if I have the kitchen sink somewhere on my trike. It is loaded down with all sorts of stuff. I am prepared for most anything. For example, I have bungee cords with me and I have battery chargers along so I can recharge my batteries anywhere I can find electricity to plug them in. This picture below is not my current set up. Now I have most of it pretty well hidden out of sight as I was able to do so the last time I worked on it.
Now I have large panniers and rear trunk bag which both hide some things as well as provide a storage place for lots of stuff. I carry plastic shopping bags in one of the panniers as I frequently use them to haul stuff in on my trike such as shopping, picking tomatoes off of the vine to take home, etc. All the bungee cords are now out of sight and in a pannier. I have to admit that I don’t normally carry a spare tire with me. That is not something that I am likely to need.
Yes, my trike is usually pretty well loaded down with various stuff. I am down to just one battery now as I have one which lasts a long time providing power for long rides. I no longer need to carry 2 or even 3 batteries on my trike like I used to. Of course, that one battery is a heavy beast.
Am I jealous of those who have and keep their trikes nearly bare-bone? Sometimes I am, but for the most part I am glad I have all this stuff with me as I like being prepared. I don’t need to call somebody to come get me and my trike should something go wrong while I am out riding. I can take care of it myself and continue on my way.
Yes, it adds weight to my trike, but lifting my trike in and out of the bed of my pickup truck helps keep me strong in my old age. I admit though that it gets more challenging as I age. I will be 77 next month. The Greenspeed Magnum trike is even heavier to lift and presents even more of a challenge. I am glad I am not lifting it daily anymore as it nearly got the best of me. A few times my wife helped me and it made the task much easier.
Well, it is time to go lift my Catrike Trail out of my truck and go riding. And I will be going prepared so that I can …
KEEP ON TRIKIN’
You are invited to come join the Tadpole Rider Facebook Group. Please note that in order to join you must first answer the three membership vetting questions.
Why wish upon a star when you can talk to the One (Jesus) Who created them?
TODAY IS THE OLDEST YOU’VE EVER BEEN, YET THE YOUNGEST YOU’LL EVER BE SO – ENJOY THIS DAY WHILE IT LASTS FOR THIS IS A DAY THE LORD HAS MADE! REJOICE AND BE GLAD IN IT!
Did you know that there are a few existing very long trails one can ride? Yeppur! One can’t possibly ride any of them in a single day. Some would take several weeks or even a few months to ride for the average rider. Unfortunately most of these long trails are not 100 % trails as they incorporate some roads to join sections of trails together. I probably won’t cover all of these long trails but here are some of them . From what I have read it is ill advised to attempt some of these rides on a trike as parts would be too difficult and challenging.
An east to west route from the nation’s capital to the west coast (Washington State). I have an ARTICLE about this trail.
Ya know, it really doesn’t make much since for me to sit here and type out these trails when others have already done so. HERE is a list of long trails in the U.S.
The problem is all too many of these trails are incomplete. Only small limited sections have been built thus far. One could find themselves tackling something they are not prepared for nor equipped for. A bicycle would be much more suited for the journey than a trike would be. In some places they are working on trail building to complete the plan while other areas nothing is happening.
It is not likely that I will ever have the opportunity to ride any of these trails, but perhaps you will. If you do I hope you enjoy it and stay safe.
We all know that SHIT HAPPENS. That includes disc brake rotors getting bent. If they are not bent too much they can usually be straightened and continue to be used. To do so requires the right tools and the knowledge of how to go about straightening them. Here is a tool you will need. It sells for about $18. Park Tools makes some good bicycle tools. This is a Rotor Truing Fork – DT-2C. There are a few other companies that sell their version of this tool. I personally like Park Tool’s and recommend it.
Here is another well made tool … Foundation Brake Rotor Truing Fork Tool
Park Tools not only make good tools, but they make good instructional videos. Here is their video on how to true a bicycle disc brake rotor.
Here is another video showing a different tool being used.
And here is yet another video …
If you choose to accept this assignment I assure you that it is not mission impossible. Just be careful and follow the instructions. You can do it! And then you can …
Here is a good instructional video produced by Park Tools. I will add some personal comments and suggestions further below.
In the video it was pointed out that the threads should have either an anti-seize product or grease applied. This is a very good idea as if you have ever encountered pedals that are extremely difficult to loosen and remove this the reason why as none was used when they were installed. If you find that you can’t loosen the pedals there some things you can try. My first recommendation is to try impact on the wrench. You can smack it with palm of your hand if you are tough enough to do so. You can use a soft hammer so as not to damage the wrench. You can also use a piece of wood to either place on the wrench handle to help protect it and use a regular steel hammer to smack the wood. You can use a board (such as a 2×4) as a hammer to smack the wrench handle. If you find the pedal threads don’t want to cooperate and turn to loosen you can try tightening it a bit more and then try loosening it. If you can’t budge the wrench to tighten it you can use impact. Just don’t try to turn it very far in tightening it. If you experience the threads being very tight and uncooperative as you try to unscrew it you may have to try using special penetrating oil such as WD-40. Even after trying that it may be a good idea and necessary to turn the threads both directions back and forth to carefully remove the pedal without doing damage to the threads. I would advise you to continue to use the penetrating oil frequently as you turn the threads back and forth as this will aid the penetrating oil to “penetrate” and do it’s job. There is always the possibility that a threading tap should be used to clean up the threads before a new pedal is installed in a crankarm that you had a difficult time removing the pedal. Hopefully you won’t encounter this problem, but if you do I think this advise will be helpful. Let’s all try to …
If you ride a tadpole trike (or any other type of human powered vehicle using a chain) sooner or later you are likely to encounter at least one incident of chain failure. If you are one of the few who manage to elude such a fate then you should indeed count your blessings. For the rest of us all I have to say is … “you better be prepared!”. Having a chain failure while out riding can leave you stranded. You won’t be going anywhere without the chain functioning intact. Even if you can call for help to have someone come get you and your trike you may have to deal with getting your trike on down a trail some distance before you get somewhere that someone can get to by car or truck to meet you. If you have never had the experience of pushing or pulling your trike along let me tell you that it is not a fun task. It will wear you out. They are far more awkward and difficult to deal with than a standard diamond frame bicycle when it comes to “walking” them.
So a discussion on chain repair is in order. If you have a chain failure you should immediately stop pedaling and come to a stop as soon as possible to help prevent further damage and hopefully keep the chain from coming off. Having to restring a chain around sprockets, derailleurs and thru chain tubes is a lot of work and can be challenging, especially for someone who has no or little knowledge or experience with it. Repairing a broken chain may sound intimidating to some, especially if they have never tried it. I want to state upfront that in my opinion the very best thing anyone can do is to get an old chain to use to practice with … learning how to take it apart and put it back together using a chain tool and also using repair/connecting links. It is the old adage … practice, practice, practice … practice makes perfect. Nowadays nearly everybody uses quick links (most often referred to as “missing links”) which are easy to use and faster than conventional repair links of yesteryear like many of us grew up with.
And if you are dealing with an 8, 9, 10 or 11 speed chain it most definitely is best to use a master link rather than reuse the original chain link and its pin. That is because they are not intended to be reused and if they are reused the link can come back apart as the pin can allow this. When the pin is removed by forcing it back out thru the side plate it shears off a metal ring which is the head of the pin. With that metal ring missing the pin is free to move and come out of the side plate leaving you broke down again. This time it could be worse than the first time. Damage can occur that might not have occurred the first time.
Never the less, a pin or two may have to be removed in order to prepare the chain so the missing link can be used. Be careful not to shorten the chain removing a link(s) as then the derailleur may encounter a problem and get damaged. Here is what a missing link looks like and how it is used.
Missing Links are made by KMC for KMC chain. If you have a different brand of chain then you should get the connecting links designed for the brand you have. SRAM makes the Power Link.
Another important note … be sure to buy and use only the connecting links made for your chain as far as the width. By that I mean what speed the trike’s chain is … 9, 10 or 11 speed for example. You can see in the picture of the SRAM PowerLink above it shows 9 speed on it.
As to chain tools one can buy an inexpensive one and they work sufficiently. I have had several of them. However, a few years ago I finally bought a more professional higher dollar chain tool and will readily recommend doing so as they work so much better than the common inexpensive type. My only regret is I didn’t do it 55 years or so earlier. That being said, I only keep my pro tool home in my toolbox. On my trike I still carry one of the common inexpensive type.
Here is the pro tool I bought. It is a Pedro chain tool.
Here is a different brand of pro tool being used to push a pin thru a chain link.
Below is one of the common inexpensive chain tools sold in many bike stores and is the type I carry on my trike.
As I stated above it is inadvisable to reuse a chain link by pushing the pin out and then back in. It is not something which is supposed to be done. A connecting link should always be used instead. That being said the following paragraph explains how to reuse a chain link, but since they should not be reused the pin should be pushed out sufficiently to get the needed link(s) apart so that a connecting link can be used.
Pushing the pins (some people refer to them as rivets) thru the links side plates using a chain tool is something one needs to learn as it is all too easy to push the pin too far and completely thru the far outside plate of the chain link. Once that happens you really have problems as they are extremely difficult to get back into the hole in the side plate. This is where it pays to learn this thru lots of practice using an old chain. They do make special pins which are for the purpose of more easily getting the pin started back into the hole. As you can see in the picture below it is tapered on the one end so that it can more easily be started back into the hole. Actually the longer end of it is slightly smaller diameter so that it can be pushed thru the link side plates easily and then the chain tool is used to push it the rest of the way thru. Once it is pushed all the way into position the long part sticking out is “snapped off” as the short part is the actual pin used in the link.
Another tool I highly recommend is called a third or helping hand tool. It is used to hold the two ends of the chain together while the connecting link is placed in the chain. It makes the job so much easier. You can buy these or make them. I have a couple of them I bought as well as a couple I have made.
Even though the missing links are supposed to be fairly easy to get apart (once they have been put together in a chain) just using one’s hands many find them extremely difficult to get apart. I think they are very difficult to get back apart just using one’s hands so I bought a special tool for this and highly recommend this to others. It makes the job so much easier and faster. I am sure there will be some who would argue this and say that they can get the missing links back apart quickly and easily just using their hands. More power to them. I have had very little success in doing it with my hands and found it to be time consuming, hard on my hands, frustrating and aggravating. The special pliers work so easy.
Here is a short video which does a pretty good job showing and explaining how to use a chain tool to push the pin, take the chain apart and put it back together. It explains how to deal with a tight link which often happens when working on a link like this.
Others can do what they want, but I always carry tools, missing links and several inches of spare chain to use in case I need links to replace bad ones on a chain. More than once I have had to use all of these items to make a repair which would have left me stranded if I was not prepared. If your chain has a side plate which has got bent to the side it is highly advisable to replace that link rather than trying to straighten and salvage it. Making a proper repair initially is a whole lot better than making a repair that doesn’t last and has to be redone.
Here is another video which shows how to connect chain links together using a missing link as well as a replacement pin. It also shows how to use the special pliers to take a missing link back apart. It also shows how to route the chain thru a rear derailleur. I had a hard time understanding him (I think he was speaking English), but I could follow the video okay.
Here is one man’s temporary emergency repair …
Obviously this is quite uncommon and for a good reason … well, more than one reason applies.
One thing to watch out for if you have to feed the chain back thru around sprockets and the derailleur is that you don’t twist the chain 180 degrees and connect the two ends back together with it like that. It is fairly easy for this to happen, especially if you have chain tubes you feed the chain into. It can turn over upside down while going thru the chain tube.
Being able to deal with a broken chain will help you to …
As the saying goes … “there’s a new kid on the block”. In this particular case I am referring to work stands for trikes. TrikeTight is producing these two work stands shown above. As you can see one is a full size stand and the other is a bench (table) top model. Both offer folding so they are easy to store and transport.
To use their own words …
“After 20 years in the bike industry manufacturing bicycle carrying solutions, the designers of this new trike/bike stand sensed there was a need for a better work stand. In the past several years lightweight, fast, and fun 3 wheeled “trikes” have become increasingly popular. Along with that growth grew the need for a better way to service those trikes. TrikeTight.com and their trike/bike work stands was created to service the need.
TrikeTight has two stands. A table top that that can go on your work bench, tailgate, or any horizontal surface. And their full size shop grade roll around work stand with lockable wheels.
Both work stand designs accept the Traps bicycle carrier to let you also work on your two wheel bike. No need to raise your seat post, just simply take off the front wheel and mount it to the Traps carrier.
Work on your trike with the work stand wheels in the full locked or unlocked position, roll it out of the way for storage, or wheel it over to your vehicle for your next ride! Use the work stand like a “lazy Susan” to easily work on any part of your trike without having to walk around away from your tools.
Both stands also fold flat so you can hang either on your wall, lean it against a wall out of the way or easily take it with you in your vehicle.”
Various options are available:
Assembly Required … again using their own words …
“The Trike Tight Work Stand was designed to be assembled from many discrete pieces, saving you money on shipping and us flexibility in configurations. Assembly time is normally minimal and the needed tools are included, a custom box wrench and the appropriate Allen wrench, (the box wrench also include a bottle opener). Their stands come with an assembly instruction sheet. Hopefully, you will find the pictures clear and the written instructions easy to understand . (Should take the average person less then an hour to assemble.)”
At the time I wrote this article the company was not quite ready to sell their product on their website. I didn’t find any prices so I emailed them to inquire into it. Here is their response:
“Price for the RollAround stand is initially going to be $400. That include the pivoting/locking wheels, adjustable Plastisol dip coated cradles, All fasteners are Stainless steel, All tubing is 6061 Aluminum Powder coated, tubing inserts (Upper for the cradles and lower for the wheels) are CNC billet machined. Stands will be shipped partially assembled….ie. some assembly required. Side plates are CNC machined 6061 Aluminum on this initial run. Future production will most likely transition to Laser cut Stainless, not for strength but for ease of production. (easier to laser cut stainless to close tolerance then aluminum). We have table top stands ready to go also…..just have not set the price yet. Probably about $199….prospective buyers could contact me directly tom@triketight.com or send an inquiry via the website.”
It is good to have the proper tools and equipment to perform needed maintenance and repair work on our trikes. Having a work stand can be extremely helpful and practical. It can make doing the work so much easier. For sure it can help us to …
Measuring and determining cassette wear is not an easy task. Basically the best advise I would know to give someone is “it comes with lots of experience”. I have seen cassettes changed when they still looked practically brand new and wondered why anyone would throw their money away doing this.
Sooner or later a tadpole trike needs maintenance performed on it. Having a work stand can be quite handy and practical. The only drawback is lifting the trike up and down in and out of the work stand.
Keep in mind that any of these images can be clicked on and viewed in their own window and will usually be much larger than they appear here.
When done viewing them just use your browser’s back button to return to this page.
Just like our cars and trucks are lifted up on a hoist so the mechanic can work on the vehicle a trike work stand makes the job much easier. There are only a very few manufactured work stands available to purchase and they can be costly. Many choose to make their own. Some make them out of metal while others use wood. One of the most popular means is PVC pipe and fittings. I have made two such work stands myself. One I made for my Catrike Trail trike and the other I made for a friend’s ICE trike. Of course, unlike the car hoist a trike work stand is usually not adjustable in height. Depending upon the individual person who will be working on the trike using the work stand the height of the work stand may want to be made different from one person to the other. As I already stated, lifting a trike up and down in and out of a work stand can be quite challenging so keep in mind that the higher the work stand is the more of a struggle it will be to accomplish the lifting.
Some use a regular bicycle work stand, but I think this is very impractical. First of all, you would no doubt have to have the help of another person to do so as it would be most difficult for one person to lift up the trike and get it positioned and then secured into the clamp. These bicycle work stands are designed for bicycles … not for tadpole trikes.
When fabricating a workstand keep in mind that you may not always have the same trike. If you make the work stand to “fit” a particular trike you may not be able to use it on a different trike should you replace the trike you made it for. You have the option of making the work stand adjustable. It will cost you more money and more work involved, but you would probably not have to ever make another one which can’t be said if you don’t make it adjustable.
To my way of thinking a work stand which adjusts vertically (independently front and back) in addition to length, width and angle of holders is the best design as it will accommodate any trike. Again, I personally think the wisest design is for the rear holding bracket to be on the main frame tube away from the chain run. As you can see in the image below this workstand has the rear holding brackets on the outer pieces of frame … right where the chain is. I think they built this thing backwards. Either that or they have the trike sitting on it backwards. 🙂
I just mentioned the matter of keeping the work stand frame away from the chain run. Another thing to keep in mind when making your own work stand is to make sure no part of the stand’s framework interferes with other parts of the trike … things like turning the front wheels both directions (including the steering parts … tie rods, handlebars, etc.) And yet another consideration is keeping the work stand frame far enough away from any area where you have to get your hands and arms in to perform work. Having the front support far apart on the crucifix will help with stability but it will also greatly reduce the area available for you to do the work on the trike.
VS.
A simple basic PVC work stand like the one pictured above can be made for approximately $25 to $35 for the materials involved. Notice the red lines I have added about half way up the vertical legs of the stand. I will refer to this further below in this article.
In making a trike work stand a practical option is to make the base so that is comes apart … a lower section to add on to the upper section to increase the overall height. The upper section can be used by itself and in doing so the trike can be much lower to the ground. The red lines I added in the image of the PVC stand is for the purpose of illustrating where to cut the legs and add couplers to connect the legs together and take them apart so that the upper section can be used by itself. If a large enough “table” is available the work stand could be sat on the table to obtain additional height such as pictured below although this work stand has no additional base to add to it. If you have the setup and space available in your work area this might be a practical approach as this work stand could be used on the floor as well.
Here is a work stand made of PVC which as you can see is quite low … just lifts the trike up enough to work on it.
Some work stands we see have the legs come straight down vertically while others come out on an angle making for a wider base.
A wider base provides more stability but those legs sticking out beyond the trike also can be troublesome getting in the way while trying to work on the trike. Also they greatly complicate the two section concept I mentioned above making it pretty much impossible to do. The strongest base is one with vertical legs although it won’t be quite as stable. Never the less, stability should not be an issue as long as the base isn’t too small in size.
To help protect the trike’s frame it is a good idea to place some sort of soft non- abrasive material on the contact points of the work stand.
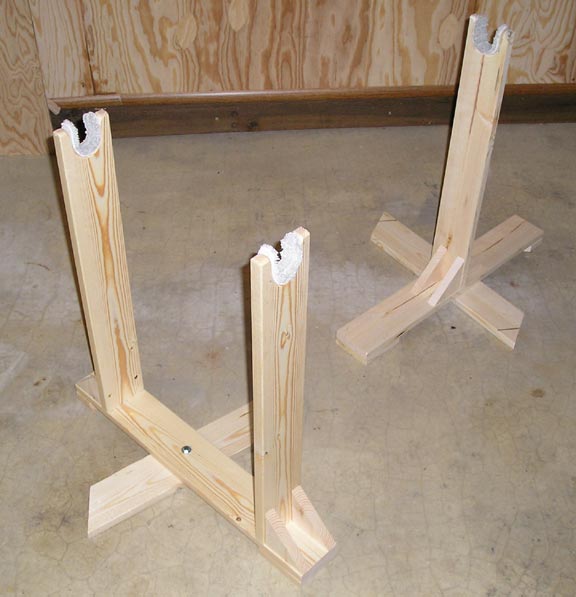
I mentioned using individual lifting devices which only lift the trike up enough to work on it. This image shows some made of wood. However, they are considerably taller than what I am talking about. Of course, the height is optional … whatever one is comfortable with and fits the bill for them.
To be most honest I seldom use my work stand anymore as I don’t like the lifting and hassle involved. The older I get the less I like using it. 🙂 Instead, I use another work stand I made which is small and much lower to the ground and therefore much easier and practical to use. I can lift just one end up at a time if needed or both ends (which is rare). Sitting on the mechanic’s stool I can easily roll myself around the trike to work on it.use a similar stand for the front of my trike. It lifts the wheels up about 6 inches off of the floor making it ideal to work on while seated on the stool. This small work stand was quick and easy to make out of some scrap wood I had laying around.
For lifting the back of the trike an indoor trainer can be used although it can get in the way of some work one might want to perform so I don’t think this is very practical.
Another option is to simply use a rope, bungee cord, strap, etc. to suspend the back end of a trike up in the air to work on it. I usually use a couple of bungee cords to accomplish this. It is fast and easy with minimal effort involved lifting the trike. And using this method there is nothing in the way down around the trike frame where you will be working. The only downside to this is that the trike easily moves about since it is being suspended with rubber cords which stretch. Of course, you have to have some place up above the trike to fasten the other end of the bungee cord to. I use my garage door opener to hook a third bungee cord to the opener making a place to hook the other two to. The two bungee cords are hooked to the rear luggage rack.
Speaking of getting in the way … I want to be sure to mention that one needs to be careful when building a work stand not to have any of the framework positioned where it interferes with the chain run including where the chain moves to when shifted between the various sprockets. There is one factory manufactured work stand I have seen pictures of which did this. I don’t know what they were thinking of but it obviously would be a big problem if you are trying to work on the shifting.
Another work stand which some might find useful are the small portable type. As you can see in the picture below it lifts the trike up quite sufficiently so that work can be accomplished. They can also be used alongside the road/trail when something goes wrong and requires maintenance work.
This one above a fellow triker, Gary Bunting, designed and built. It will pivot to accommodate alignment where it is placed and is quite portable as it comes apart in sections to fit in panniers or whatever else one chooses to haul it in. It also has an extension which can be added for additional height.
Here is a video on one of the manufactured work stands which can be purchased:
Their premium model which is fully adjustable is currently $449 plus shipping.
Another excellent work stand comes from Sportscrafters and also sells for $449.
As you can see it adjusts all directions horizontally to fit the trike as well as vertically to adjust the work height. It also has built in tie downs so the trike can’t fall off.
Here are some work stands for specific trikes, namely the Catrike 700:
straight legs above and slanted legs below
same as above showing dimensions
Lastly, since a PVC work stand is relatively lightweight one can fairly easily hang it up on a garage wall out of the way. Obviously they are rather large so they take up a lot of space sitting down on the floor. Mine just hangs on the wall anymore as I don’t use it and probably won’t anymore.
Most of these work stands made of PVC use 1.5 inch diameter piping and fittings. The fittings vary according to the design needs: 90 and 45 degree elbows, Tees, 4 ways, 3 way corner, etc. Here are some examples:
The fittings which cradle the frame have to be cut and shaped to fit the frame. I personally would smooth out the cutout and round off the corners some so that they were’t sharp edges.
And here is another website which has an article on trike workstands:


 If you ride a tadpole trike (or any other type of human powered vehicle using a chain) sooner or later you are likely to encounter at least one incident of chain failure. If you are one of the few who manage to elude such a fate then you should indeed count your blessings. For the rest of us all I have to say is … “you better be prepared!”. Having a chain failure while out riding can leave you stranded. You won’t be going anywhere without the chain functioning intact. Even if you can call for help to have someone come get you and your trike you may have to deal with getting your trike on down a trail some distance before you get somewhere that someone can get to by car or truck to meet you. If you have never had the experience of pushing or pulling your trike along let me tell you that it is not a fun task. It will wear you out. They are far more awkward and difficult to deal with than a standard diamond frame bicycle when it comes to “walking” them.