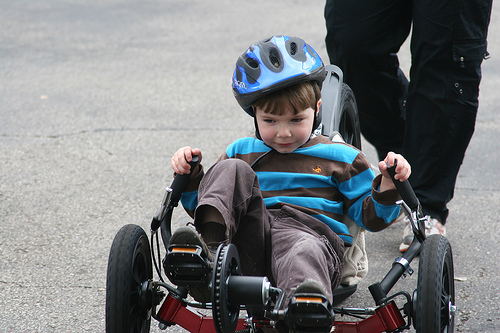
There is a lot of attention given and interest in motorized trikes but I am here to tell you that there are other options. One of them features FIDO … or whatever your dog/dog’s name is/are. Dogs need exercise and so do we humans. Here is a way to combine both dog, man and a tadpole trike.
The amount of exercise the dog gets would depend upon the dog, of course, And the same is true for the rider. The amount of exercise he/she would get would depend upon the dog/dogs. Some dogs are far better than others at providing propulsion. Some dogs love to pull while others almost need to be pulled. 🙂 The size and subsequent power of the dog comes into play too, of course. A small dog could be walked with a rig like this, but it stands to reason that such a dog won’t be able to help propel a trike and rider along. We are used to hearing HP (horsepower) to indicate the amount of power available. Here we are talking dog power. 🙂
In the picture above there is only one dog visible, but hey, the sky’s the limit … well, maybe not. You can have more than one dog hooked up …
One of my pet peeves is dog owners who allow their dogs to be off leash and therefore out of the owner’s control. And nearly as bad is the matter of those who use the long leashes to where the dog if far away from the owner. Here where I live both are no no’s. It is against the law to allow a dog to be off leash and it is against the trail rules to use those long leashes. I have had several encounters with dogs who are off leash and I don’t appreciate it. You never know what is going to happen. I have had to slam on the brakes numerous times to keep from hitting a dog that runs or walks right in front of me. I have had dogs come charging right at me not knowing the outcome of such. It can be unnerving. And most dog owners who do these things have a serious attitude problem which comes across clearly if you dare say anything to them.
I take my dog out walking on a short leash alongside of my trike. I keep him outboard of the right front wheel, but if there is traffic where this presents a problem I bring him back closer to me behind the front wheel. Of course, he is not a huge dog so this works okay for us.
Anyway, with this rig the dog/dogs are well under control making them safe as well as others. The only thing I have to say here is that one would need to be careful of the total width and the width of the trail one is riding on as anything less than a 10 foot wide trail two dogs wide would be the maximum width. Even on a ten foot wide trail the lane would be filled pretty much to maximum. The three and 4 dogs abreast would be way too wide to safely and lawfully go down a trail. Not only is the safety and well being of others a concern, but it is also true of the dogs. I would not want to see them get injured because they stick out too far on a trail too narrow to accommodate them. And one would have to be careful how close he got to the edge of the trail, especially if there is a fence, wall, weeds, tree limbs, etc. they could get into. With the rig sticking out quite a bit further than the trike itself the rider would need to be extra careful. The dog could get injured and it is quite possible that the trike would be turned that direction and into whatever is there.
I know that there are many who “spurn the law”. Obeying the trail rules means nothing to them. I deal with it everyday. If you are such a person then what I am writing here probably offends or even angers you. What can I say? Such lawlessness is prophesied in God’s Word as part of the End Times we are now living in.
Here are some videos …
There are other manufacturers of dog powered products. Here is a video featuring one of them:
As you can see with 3 dogs it is still too wide. Two dogs with this setup would be okay as far as the width issue.
There is no more important drink on the face of the earth than water. And there is nothing healthier to drink than water. Sadly, most of us don’t drink nearly as much water as we should. It is said that we should consume half of our body weight in ounces of water each and every single day. That is a lot of water! Someone who weighs 180 pounds should be drinking 90 ounces of water a day. Someone who weighs 280 pounds should be drinking 140 ounces a day. Drinking a sufficient amount of water not only keeps us properly hydrated but it helps flush toxins out of the body. Lots of people think it is okay to drink other types of liquids … soft drinks, coffee, tea, fruit juices, etc. in place of water, but it just ain’t so. Actually we need to be very careful consuming any other liquids of any kind … limiting them considerably and mostly drinking water. My wife and I personally seldom drink anything but water. It is not only much healthier but it saves a lot of money. And once you wean yourself off of whatever ever other drinks you are addicted to you won’t miss them at all. In fact, if you try drinking one of them you might find you don’t even care much for it anymore.
When we go riding we need to have a good supply of water along. Different people use different means of carrying it. Some just use the common inexpensive plastic water bottles. Some use insulated plastic water bottles. Some use a bladder system with a tube to drink from. Then there are those of us who use metal water bottles … either aluminum or stainless steel. I personally don’t like drinking out of plastic or aluminum. I use stainless steel and love it as there is absolutely no taste from the container. I have tried various plastic water bottles including the insulated ones. It is true they outperform just a plain plastic bottle but as far as their boast of keeping drinks cold for many hours … ha … not hardly! I would fill mine clear full of ice cubes then top it off with water. It would last 2 to 3 hours at the most. My riding friends had the exact same experience using them. Then we discovered the stainless steel water bottles made by Thermos. They work great! I fill it with ice cubes and top it off with water and it will last 2 – 3 days. Of course, it all depends upon the weather conditions and exposure to the direct sunlight. These bottles are available in a few colors besides the normal stainless steel appearance. I advice against getting anything other than the normal stainless steel type as the colored ones will absorb the sunshine and the contents won’t last as long as far as staying cold.
I know some people don’t want cold water … just room temperature. And I know they say it is healthier to drink water at room temperature, but I like ice water. I can’t stand drinking warm water. There are other brand of stainless steel water bottles besides Thermos but I caution you about their quality. A friend bought another brand and it doesn’t work nearly as good as keeping the water cold as long. Of course, that is just one other brand and I certainly can’t speak for all the others as far as how they do. The Thermos brand comes in two sizes as far as I am aware of. There is an 18 ounce size and a 24 ounce size. I have one 18 ounce and two 24 ounce bottles. I don’t care nearly as much for the 18 ounce as I do the 24 ounce. This is what the 24 ounce looks like:
As far as water bottle holders I have tried a few different ones but I really like the plastic one I use now. It is low cost yet it does a great job. The one I use is a Origin 8.
I bought mine at a local bike shop (LBS) and I always encourage support of your LBS
The steering geometry of tadpole trikes is complex and it is important that everything is right in order for proper and safe operation. Toe in is a common steering setting found on cars, trucks, buses, etc. Here is a drawing of this adjustment using a car for illustration:
On a tadpole trike this adjustment should never be set to where there is toe out. Most manufacturers recommend about 1/16 of an inch toe in. However, the truth of the matter is the closer you can get it to neutral and still handle well the better. By neutral I mean the wheels are straight … no toe in and no toe out. If this adjustment is off very much it can seriously effect the handling as well as wear the tires out very quickly as the rubber will be “scrubbed” off.
Making this toe in adjustment is relatively easy, especially on a direct steering trike. On an indirect steering trike it is a little bit more involved, difficult and time consuming. A tape measure can be used although I personally think there is a better way which is easier and more accurate. They make a tool to do this. Catrike sells one called the Calibro. It sells for about $50. It is rather large and so in my opinion is a bit difficult to use. Keep in mind that oftentimes there are such things as cables, wires, spokes, fender braces, etc. to contend with. Trying to use a large tool in these areas can be challenging. Again, personally I think there is a better way (better tool and much much cheaper … maybe even free). I use a telescoping radio or tv antenna. I already had two or three of these laying around so the price was right. 🙂
It is the “cat’s meow” as far as I am concerned. For those who don’t understand this American expression, “cat’s meow” simply means perfect or ideal. Just make sure the antenna telescopes out far enough to reach the distances involved. I don’t advise using the tires to measure off of as you may not get as accurate measurement on them as you will on the wheel rims. Of course, if you wheels are out of alignment or bent you won’t get an accurate measurement.
The way to measure the toe in on a tadpole trike is to take measurements between the front and back of the front wheels. The measurement should be taken as close to the center of the wheel as possible front and back. You many have to go on the bottom of the boom on the front and on top of the boom in the back to keep the measuring position the same height off of the ground front and back. The measurement in the front should be approximately 1/16 of an inch less than the measurement in the back. When the rider is seated on the trike this measurement will change somewhat … depending upon the weight of the rider and the frame of the trike (what it is made out of). This is covered in the first video below. The wheels will tend to toe out a little with the rider’s weight on the trike. Ideally this measurement and adjustment should be made with the rider seated on the trike distributing his weight as nearly normal as he can. To do this it will require another person actually taking the measurement and doing the adjusting to get the toe in set properly. On my trike when I sit down my toe in measurement changes about 1/16 of an inch. So if I am doing this by myself I know I can set the toe in at 1/16 of an inch and then when I sit down in the trike the toe in will change to 0 or neutral … exactly where I want it. Here are a few videos showing how to set the toe in on a tadpole trike … both direct steering and indirect steering.
This first video shows TerraTrike trikes:
This next video clearly shows using the telescoping antenna to set the toe in adjustment on a Catrike:
The third video shows adjusting the toe in on an ICE trike:
Lastly, this next video shows the Calibro tool being used on a KMX trike:
Did you notice that these guys are riding on the wrong side of the trail? 🙂
I have found that this toe in setting can change by itself even when the lock (jam) nuts are tight. Don’t ask me how this happens. So I highly recommend checking the toe in measurement periodically to make sure it hasn’t changed. Remember handling and tire wear will be effected should the toe in adjustment get off too far.
This blog is about tadpole trikes and I pretty much try to stick to that. However, every once in awhile I come across something that impresses me and gets my attention. So without further ado I present to you the reader a delta trike. It is still a recumbent trike. It is a bit unusual which you shall soon see. Meet the COMFORIDER TRIKE.
Remember all images in WordPress blogs can be clicked on to open in their own window. Oftentimes they will be displayed much larger so you can better see them. When done just use your browser’s back button to return to this page.
As you can readily see it is not a low rider. Here is what the manufacturer says about this trike on their WEBSITE:
Unlike any other existing model, this tricycle has several features that make it more versatile, more comfortable to drive, and incredibly easy to store and transport.
– Modular structure, variable configuration
– Spring suspended seat
– Leaning seat
– Car style steering
– Leg operated back pedaling brakes
– Folding for storage
– Disassembling for transportation
This trike can be set up in various configurations including a velomobile.
And there are various options available:
As stated this trike folds as well as disassembles for transporting and storage purposes. The first step is to remove the seat which is suspended on springs on the back side.
The trike has a single rear driving wheel, back pedaling brakes and automotive style steering. Here are some images showing this:
They have some videos of this trike available:
They even have a couple of motorized versions shown on their WEBSITE.
I assume that the engine is a 4 stroke and not 2 stroke, but they don’t specify. Here is an electric motor version:
You can check out some of their options HERE. And HERE you can check out a lot of details about the trike. Here are a couple of samples of what can be found on their detail page.
The Comforider is not a tadpole trike. It is not a low rider. It is a recumbent. And it does look like it would be a comfortable ride. It may be somebody’s “cup of tea”. (For the benefit of those reading this who are not Americans and don’t understand what I just said the term “cup of tea” means “what someone likes or is interested in”.)
Here is an interesting website I just discovered thru the Facebook Recumbent Trikes Group. Many of us remember the song by Ricky Nelson, “I’m a travelling man”. Well, this here is a travelling woman and like the Beach Boys she can sure say “I get around”. Check out her website:
Her name is Sylvia Halpern. She is on Facebook, Twitter, Flickr and YouTube. Yep, she is a world traveler … on an HP Velotechnik Scorpion tadpole trike. It most definitely sounds like a lot of fun and adventure to travel around like she does … and on a tadpole trike!
Not everyone lives near a dealer where a tadpole trike can be purchased. In this day and age of the computer and the internet we don’t even have to leave home to shop for a trike. There are dealers who ship out trikes pretty much anywhere and everywhere here in the United States and even beyond. Two of the best known are Utah Trikes and Hostel Shoppe. Another well known, popular and respected online retailer is Amazon. And, yes, they sell some tadpole trikes … namely KMX (K 3, Kompact, Venom, Tornado, Viper, and Typhoon), TerraTrike (2 & 3 speed Rovers, Rambler GT, and Tandem Pro), and Performer (X 27, JC 20, JC 70, and Trike E). For those not familiar with Performer trikes they are basically the same thing as ActionBent trikes. ActionBent is now defunct (out of business). This may not be a complete list, but it is all I found. There are some manufacturers who will sell and direct ship their trikes to the individual customer rather than going thru a dealer. I know that Trident does. I have a friend who bought an ICE trike this way. I need to mention that he did so by telling them he wanted to become a dealer. He has bought two trikes from ICE this way thus far. Both are for his personal use. He has not yet sold any ICE trikes as a dealer even though he would like to. Anyway, I am not sure just what their policy is on this. Looking at their website I don’t see this mentioned. Perhaps by contacting them it can be done. Keep in mind that when one orders a trike shipped to them they might find themselves dealing with some setup work. If this is the case one needs to be mechanically inclined and equipped to do such work.
Concerning Performer trikes you might want to read this customer’s write up about his personal experiences upon ordering one.
Here is a video which has been around for awhile. It shows tadpole trikes passing up the “roadies”. It is fun to watch as I am sure it was fun to actually do.
I would not have any idea how many of us started off quite young riding a tricycle. Some of us skipped this and started off on a two wheel bicycle (usually equipped with training wheels). I never rode a tricycle as a child to the best of my recollection … at least not until later and I think I just rode someone else’s briefly. My parents are both deceased so I can’t ask them about tricycles in my childhood. To the best of my knowledge my first experience on a human powered cycle was a 20 inch bicycle and no training wheels. An older cousin worked with me and helped me learn to ride it. I think I was 5 years old at the time.
But, hey, I am not here to talk about me … at least not at this time. Most of us go the “normal” route … tricycle, conventional bicycle, recumbent bike, recumbent trike .. or perhaps directly to a recumbent trike from a conventional bicycle. My point is there seems to be somewhat of a “cycle” going on here and I am not referring to cycle as in bicycle. The question is … “are we in our second childhood in turning to a recumbent trike?” I guess it could be worse. We could be like one of these guys …
Now they may be having fun, but it just doesn’t look like nearly as much fun as riding a tadpole trike. I mean … just look at this guy. Doesn’t he look like he is really enjoying himself?
Oh, that’s me! Well, then I certainly should be in a position to know and yes, I was having a lot of fun riding. In fact, this picture was taken the day of my first ride on this 2013 replacement frame with mostly new parts so it was like having a brand new trike.
But you know even a young child I am sure would say that it is more fun to ride a tadpole trike than a tricycle.
There is just something about riding a tadpole trike which is so very neat. And I think mom would approve!
The theme is right … having fun riding on tadpole trikes.
I want to state upfront that if you don’t know what you are doing when it comes to adjusting a derailleur (front or rear) don’t attempt it as you will likely make things worse. That being said, it is not necessarily a difficult thing to learn. Here are some resources to help:
There are gobs of other sources available online about this subject. From my own personal experiences I don’t buy into everything I read about this as far as the instructions they give. I have found that what seems to work on a bicycle may not always work as well on a trike … strange as that may sound. Every time without fail that I have had a “professional mechanic” adjust my rear derailleur I have had to redo it myself as their work never lasted long before problems developed. It usually did good to last thru the day. The way I go about this I learned a few years ago and I have found that it works quite well and remains working for a very long time. So without further ado here is how I recommend adjusting the derailleurs.
Keep in mind that a derailleur moves the chain from the smallest sprocket onto the largest sprocket … that is to say that with no tension on the shifting cable the chain will be (should be) on the smallest sprocket. As the cable is tightened (by rotating the twist shifter or moving the shift lever) the derailleur will move the chain over onto larger sprockets.
The first thing one should check the rear derailleur itself … making sure it is straight, not bent out of position. The area of the frame where the rear derailleur bolts onto (known as the derailleur hanger) is made to bend (or even break off) to protect the rear derailleur from being damaged. Sometimes the derailleur still gets damaged anyway. Oftentimes the mounting area can be straightened. I have straightened them just with my bare hands taking a hold of the derailleur to use as leverage. Of course, one needs to be careful not to bend the derailleur in the process. The main reason I have done it this way is because I was out riding at the time and didn’t have the “special tools” needed to work on this. Sometimes it was someone else’s bike or trike I was working on trying to get them going again. This brings me to another point … namely if something happens where you can’t pedal normally and easily stop pedaling immediately and don’t try to push hard on the pedals forcing the crank to turn. By doing this you can cause serious damage back there with the rear derailleur and derailleur hanger. This and getting a tree limb or something such kicked up into the works back there are probably the two main causes of damage.
I have also used tools I rigged up. There is a tool made for this which one can purchase. However, I have found that with a 20 inch rear wheel and fenders it is quite difficult and impractical to use if if not impossible. If you have a “good eye” and know what you are doing you can accomplish this task just looking at things. Sometimes the derailleur hanger won’t straighten sufficiently and needs to be replaced. As stated, they are designed to bend or even break off so they are easy to replace. Depending upon where the hanger got bent it may be easy to straighten. If it bent thru the threaded hole I would strongly advice replacing it as it isn’t practical to try to salvage the threads.
Here is what the Catrike derailleur hanger looks like:
Other brands look similar. If you look up images of a derailleur hanger you will find that they make what seems like a blue million of them … all different from the other.
And here is what the tool used to straighten a bent derailleur hanger looks like:
And here is a picture of a bent derailleur hanger:
Of course, this is a minor bend. A bike or trike can usually still be ridden with this sort of damage until such time as it can be worked on.
Here is a picture of a really bad bend which has moved the derailleur right over into the spokes of the rear wheel so that it can’t be ridden.
Keep in mind that this is shown being done on a bicycle and not a tadpole trike. It is easier to do on a bike which has a much larger diameter wheel (unless you have a 26 inch or 700 rear wheel) and nothing much in the way than a trike with a 20 inch wheel and oftentimes some stuff in the way.
Once the alignment of the rear derailleur is checked out and is determined not to be bent you can proceed on to the next step which is determining if the derailleur is properly aligned at the extreme travel between the smallest and largest sprockets (cogs). The sprockets should be perfectly lined up vertically with each other.
This alignment needs to be done before any other adjustment is attempted.
Note – I am sure there will be people who don’t agree with what I am sharing here. That’s okay, but I really am not interested in hearing/reading comments about it since I have seen the results of doing it other ways. I paid out good money to have someone do it their “other ways” and wasted my money as I had to redo it myself.
To make this adjustment the shifting cable ideally should be completely disconnected from the derailleur. In the high gear position (smallest sprocket or cog for those who insist on being technical) the adjustment is quite easy to do since the spring(s) in the rear derailleur move and keep the derailleur over on that side. Adjusting it on the opposite side is a little more involved and difficult since you are fighting the spring(s) to move the derailleur over and hold it there … but it can be done. I just pull the derailleur over by hand the same as the cable does. Once you have this vertical alignment done you can proceed to the next adjustment which is the actual shifting.
Before doing any adjustment for the shifting there are some prerequisites:
1) be sure that the shifting cable is still detached from the rear derailleur
2) turn in any shifting cable barrel adjusters all the way in and then back them out about 3/4 of a turn
3) shift the shifter into high gear position
4) the chain needs to be on the smallest sprocket of the crankset (front sprockets where the pedals are)
5) the chain should already be on the smallest sprocket on the rear but make sure it is
6) make sure the shifting cable is seated all the way into the ferrules all thru its run (shifter, rear derailleur and any other place which might apply)
With all these things done you are ready to continue …
1) take all the slack out of the shifting cable by pulling it (with your fingers only) tightly down at the rear derailleur and then tighten the clamp down on the cable to hold it with the slack removed
Note: If you have help available this next part is much easier to do with their assistance since a tadpole trike’s chain run is much longer than a bicycle’s. I don’t think a gorrilla has arms long enough to reach the pedals and have their face back by the rear cassette (sprockets) so they can see what is happening.
By following these instructions above the shifting should work fairly well as is. However, it may need slight tweaking to dial it in so pedaling and shifting is required. You can make minor adjustments by turning a barrel adjuster on the shifting cable. You shouldn’t have to turn it very far either way. Usually, if anything is needed, making the cable slightly tighter is the answer. Getting it truly dialed in usually is best accomplished while riding it and seated.
Here is the rear derailleur nomenclature:
That should be it for the rear derailleur. The front derailleur is usually much simpler and not as sensitive as the rear derailleur. Here is a video explaining how:
There is one adjustment I have not mentioned as of yet. It is the “B-Tension” or angle adjustment screw. Basically you should adjust the B-tension screw so that the pulley on the rear derailleur is as close to the largest cog on the cassette as possible without dragging. On a bicycle the angle of the chain coming onto the rear cogs is different than it is on my tadpole trikes. Because of this the appearance of the chain as it wraps part way around the sprocket varies from what is seen on a bicycle. In the drawing below notice how much more of an angle on the trike compared to the bike. I point this out because one can’t go by what they say about this adjustment for bicycles since a tadpole trike is different. Basically speaking in either case, bike or trike, the chain wraps approximately half way around the sprockets. The B tension adjustment should reflect this and still have about 5 to 7 mm or about .2 to .27 inches gap ( just over 3/16 to about 17/64 inch).
Park Tools says:
“For derailleurs with a spring in the upper pivot, begin by shifting to the innermost rear cog, which is the largest cog. View the upper pulley relative to the largest cog. If the pulley is rubbing against this cog, tighten the B-screw to increase upper pivot spring tension, which pulls the pulley back and away from the cog. If there is a large gap between the upper pulley and cog, loosen the screw. To find a good setting, loosen the B-screw until the upper pulley begins to rub, then tighten the screw to get clearance.”
To be most honest and upfront with you it is this adjustment I have struggled with the most … not being sure of what I am doing and the end result. All I know is I am not having any trouble with the shifting.
Here is one set of instructions I just found:
With the chain shifted to the largest rear sprocket turn the crank (pedal the trike) and open up the B tension screw until you hear a rattling noise and the rear derailleur starts to vibrate. Then tighten the B tension screw until you hear no rattling. They say that the jockey pulley of the rear derailleur should be as close as possible to the large rear cog without making any noise.
This is how I go about adjusting my derailleurs and it works great for me. I have tried to talk to mechanics about this and they just pay no attention to me and continue on doing things the way they always do. They may get away with it on bicycles, but it sure doesn’t work on my trike. That’s why I usually don’t let them adjust my derailleurs anymore. I tell them it shifts fine as is … please don’t touch it!
MISC TIDBITS:
Lubrication –
The derailleurs should occasionally be lubricated as they have several moving parts … all of which need a drop of oil applied periodically. This will ensure that they move freely and function properly.
Today’s cables (shifting and brake) are said to be pre-stretched and pre-lubricated. That means that supposedly readjustment should not be necessary due to the cable stretching after use. And “they” say that cables should not be lubricated … not ever. You won’t go to jail if you do and I have done it myself on occasion and it was helpful. I have had moisture get inside of the cable housing and in the winter time the cable froze up and caused problems.
“Cable Adjustment
The cable tension adjuster defines how far up or down the derailleur moves. Step back so you can see the chain and sprocket alignment, and then through the gears in both directions, first shifting up two and down one, and then down two and up one. The chain should look centered on each sprocket. If it is rubbing on a larger gear it means there is too much tension on the cable. Loosen the tension by turning the adjuster clockwise. If it wants to jump down to a smaller gear it needs more tension. Increase the tension by turning the adjuster counter-clockwise.
You can also use sound to check the adjustment. There is always a base-level of noise that can be heard in every gear. This noise will increase in a slightly different way depending on which way the tension is out of adjustment. If there is too much tension you will hear a metallic rubbing sound, but if there is too little tension you will hear a clicking noise as the chain tries to jump to a smaller sprocket. There is usually a cable tension adjuster on your shift lever. With practice you will be able to make small cable tension adjustments while you are riding.” (from the Sheldon Brown website)
Here are the original instructions I came across several years ago. I don’t remember what website I found it on so I can not give credit here for it.
“Adjusting your derailleur
One of the main problems that I find on every single bike that comes through my shop is that the derailleurs are out of adjustement. The derailleur is that thing in the front and back of the chain drive that “derails” the chain into it’s proper place. Now, don’t bother fidling with the thing as it is, let’s start fresh.
FIRST: Unscrew the cables from their attachement on the derailleurs. Bring the shifters back to their dead position, that’s when there is no pull on the cable and make sure that all the cable housing adjustment screws on the shifters and/or derailleurs are screwed back in to their original position(more on that later).
SECOND: Now with everything deconnected, turn the pedals and the chain should come to rest in the last position gear on the outside of the wheel and at the first one closest to the frame on the chain ring. That’s because the system works by pulling on the devices with the cable. If you are not at the last gear on the wheel and the first one at the chain ring, you have already found a problem. You have two screws on every derailleur, one to adjust the last gear: “H” and one to adjust the first gear “L”. This is the same on every derailleur, adjust that screw by going clockwise to move the derailleur in and counterclockwise to move it out. Careful, in the rear one you could end up with the chain in between the wheel and the frame, go slowly.
THIRD: Now that your derailleurs are adjusted properly at their last position gear, reinstall the cable. Make sure there is no slack in the cable. Now turn the pedals and click in the first position for the rear derailleur, it should go into the next available gear. Not doing that? Don’t worry, remember that adjustement screw on the cable housing? Now start to unscrew it slowly while turning the pedals. This will strech the cable a little bit at a time. Unscrew it until the chain goes into the next available gear,”click” that’s it, you’re done. Now shift until you have pulled the cable all the way to first gear. If it goes there, you’re good. If not,one of two things have happened. Booboo one is that the chain won’t go into first, simply unscrew “L” slowly until it does while keeping tension on the cable with the shifter. Booboo two, the chain is now between the gear and the spokes of the wheel. Carefully remove the chain and set it on the first gear and screw “L” to block the derailleur from going forward.”
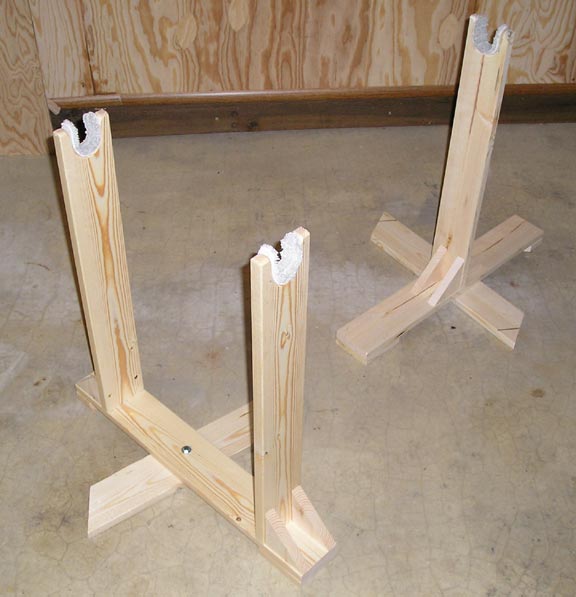
Sooner or later a tadpole trike needs maintenance performed on it. Having a work stand can be quite handy and practical. The only drawback is lifting the trike up and down in and out of the work stand.
Keep in mind that any of these images can be clicked on and viewed in their own window and will usually be much larger than they appear here.
When done viewing them just use your browser’s back button to return to this page.
Just like our cars and trucks are lifted up on a hoist so the mechanic can work on the vehicle a trike work stand makes the job much easier. There are only a very few manufactured work stands available to purchase and they can be costly. Many choose to make their own. Some make them out of metal while others use wood. One of the most popular means is PVC pipe and fittings. I have made two such work stands myself. One I made for my Catrike Trail trike and the other I made for a friend’s ICE trike. Of course, unlike the car hoist a trike work stand is usually not adjustable in height. Depending upon the individual person who will be working on the trike using the work stand the height of the work stand may want to be made different from one person to the other. As I already stated, lifting a trike up and down in and out of a work stand can be quite challenging so keep in mind that the higher the work stand is the more of a struggle it will be to accomplish the lifting.
Some use a regular bicycle work stand, but I think this is very impractical. First of all, you would no doubt have to have the help of another person to do so as it would be most difficult for one person to lift up the trike and get it positioned and then secured into the clamp. These bicycle work stands are designed for bicycles … not for tadpole trikes.
When fabricating a workstand keep in mind that you may not always have the same trike. If you make the work stand to “fit” a particular trike you may not be able to use it on a different trike should you replace the trike you made it for. You have the option of making the work stand adjustable. It will cost you more money and more work involved, but you would probably not have to ever make another one which can’t be said if you don’t make it adjustable.
To my way of thinking a work stand which adjusts vertically (independently front and back) in addition to length, width and angle of holders is the best design as it will accommodate any trike. Again, I personally think the wisest design is for the rear holding bracket to be on the main frame tube away from the chain run. As you can see in the image below this workstand has the rear holding brackets on the outer pieces of frame … right where the chain is. I think they built this thing backwards. Either that or they have the trike sitting on it backwards. 🙂
I just mentioned the matter of keeping the work stand frame away from the chain run. Another thing to keep in mind when making your own work stand is to make sure no part of the stand’s framework interferes with other parts of the trike … things like turning the front wheels both directions (including the steering parts … tie rods, handlebars, etc.) And yet another consideration is keeping the work stand frame far enough away from any area where you have to get your hands and arms in to perform work. Having the front support far apart on the crucifix will help with stability but it will also greatly reduce the area available for you to do the work on the trike.
VS.
A simple basic PVC work stand like the one pictured above can be made for approximately $25 to $35 for the materials involved. Notice the red lines I have added about half way up the vertical legs of the stand. I will refer to this further below in this article.
In making a trike work stand a practical option is to make the base so that is comes apart … a lower section to add on to the upper section to increase the overall height. The upper section can be used by itself and in doing so the trike can be much lower to the ground. The red lines I added in the image of the PVC stand is for the purpose of illustrating where to cut the legs and add couplers to connect the legs together and take them apart so that the upper section can be used by itself. If a large enough “table” is available the work stand could be sat on the table to obtain additional height such as pictured below although this work stand has no additional base to add to it. If you have the setup and space available in your work area this might be a practical approach as this work stand could be used on the floor as well.
Here is a work stand made of PVC which as you can see is quite low … just lifts the trike up enough to work on it.
Some work stands we see have the legs come straight down vertically while others come out on an angle making for a wider base.
A wider base provides more stability but those legs sticking out beyond the trike also can be troublesome getting in the way while trying to work on the trike. Also they greatly complicate the two section concept I mentioned above making it pretty much impossible to do. The strongest base is one with vertical legs although it won’t be quite as stable. Never the less, stability should not be an issue as long as the base isn’t too small in size.
To help protect the trike’s frame it is a good idea to place some sort of soft non- abrasive material on the contact points of the work stand.
I mentioned using individual lifting devices which only lift the trike up enough to work on it. This image shows some made of wood. However, they are considerably taller than what I am talking about. Of course, the height is optional … whatever one is comfortable with and fits the bill for them.
To be most honest I seldom use my work stand anymore as I don’t like the lifting and hassle involved. The older I get the less I like using it. 🙂 Instead, I use another work stand I made which is small and much lower to the ground and therefore much easier and practical to use. I can lift just one end up at a time if needed or both ends (which is rare). Sitting on the mechanic’s stool I can easily roll myself around the trike to work on it.use a similar stand for the front of my trike. It lifts the wheels up about 6 inches off of the floor making it ideal to work on while seated on the stool. This small work stand was quick and easy to make out of some scrap wood I had laying around.
For lifting the back of the trike an indoor trainer can be used although it can get in the way of some work one might want to perform so I don’t think this is very practical.
Another option is to simply use a rope, bungee cord, strap, etc. to suspend the back end of a trike up in the air to work on it. I usually use a couple of bungee cords to accomplish this. It is fast and easy with minimal effort involved lifting the trike. And using this method there is nothing in the way down around the trike frame where you will be working. The only downside to this is that the trike easily moves about since it is being suspended with rubber cords which stretch. Of course, you have to have some place up above the trike to fasten the other end of the bungee cord to. I use my garage door opener to hook a third bungee cord to the opener making a place to hook the other two to. The two bungee cords are hooked to the rear luggage rack.
Speaking of getting in the way … I want to be sure to mention that one needs to be careful when building a work stand not to have any of the framework positioned where it interferes with the chain run including where the chain moves to when shifted between the various sprockets. There is one factory manufactured work stand I have seen pictures of which did this. I don’t know what they were thinking of but it obviously would be a big problem if you are trying to work on the shifting.
Another work stand which some might find useful are the small portable type. As you can see in the picture below it lifts the trike up quite sufficiently so that work can be accomplished. They can also be used alongside the road/trail when something goes wrong and requires maintenance work.
This one above a fellow triker, Gary Bunting, designed and built. It will pivot to accommodate alignment where it is placed and is quite portable as it comes apart in sections to fit in panniers or whatever else one chooses to haul it in. It also has an extension which can be added for additional height.
Here is a video on one of the manufactured work stands which can be purchased:
Their premium model which is fully adjustable is currently $449 plus shipping.
Another excellent work stand comes from Sportscrafters and also sells for $449.
As you can see it adjusts all directions horizontally to fit the trike as well as vertically to adjust the work height. It also has built in tie downs so the trike can’t fall off.
Here are some work stands for specific trikes, namely the Catrike 700:
straight legs above and slanted legs below
same as above showing dimensions
Lastly, since a PVC work stand is relatively lightweight one can fairly easily hang it up on a garage wall out of the way. Obviously they are rather large so they take up a lot of space sitting down on the floor. Mine just hangs on the wall anymore as I don’t use it and probably won’t anymore.
Most of these work stands made of PVC use 1.5 inch diameter piping and fittings. The fittings vary according to the design needs: 90 and 45 degree elbows, Tees, 4 ways, 3 way corner, etc. Here are some examples:
The fittings which cradle the frame have to be cut and shaped to fit the frame. I personally would smooth out the cutout and round off the corners some so that they were’t sharp edges.
And here is another website which has an article on trike workstands:
For anyone wanting to build their own tadpole trike Atomic Zombie has plans they sell to use to make the task smoother sailing. When I built my tadpole trike I did so entirely on my own. I designed my trike and all went well even though it was a learning experience and there were a couple of things I would do differently if I were to build another one. One thing about using plans is that you can know what you are going to end up with before you start and choose what you want from what is offered. As long as you follow the instructions it should all go well and you should not end up with wasted material, etc. which can happen if you aren’t following a set of plans with everything laid out for you including a materials list and cutting instructions.
Do It Yourself Plans … $18 for one set of plans … more than 36 plans available … occasionally they offer specials where you can buy a few sets of plans for a low price (example: 6 for about $30)
I just discovered a new blog about tadpole trike riding … the personal blog of a tadpole trike rider named Chris who lives in Tuscon, Arizona … hence the blog title …
This blogger rides a Sun T3 CX tadpole trike. He is new to tadpole trike riding. He says he plans on buying another tadpole trike for himself and then give this trike he now rides to his wife so she can ride with him.
This 10.5 minute video will give you an idea of what it is like riding out on a desert trail:
Chris states that there are lots of trails to ride in and around the Tuscon area with more being built.
For those who have been waiting for the Catrike Trail Folder model to make its appearance your wait is over. It is out!
To the best of my knowledge and understanding it is identical to the standard Trail model with the exception of the hinged frame so that it folds. This feature adds $350 to the cost. The Catrike Trail Folder incorporates a couple of neat features which I applaud. I am talking about the fact that the seat folds and doesn’t have to be removed in order to fold the trike. The other thing I really like is that the trike has small diameter wheels built onto the frame so that when folded the trike sits on these two small wheels as well as the stand which also helps handle and control the chain as the trike is folded. With this setup two things are accomplished. First the trike frame/seat is held up off of the ground. Secondly, the trike can easily be rolled around on these wheels eliminating the need to lift it and carry it.
Here is wishing everyone in America a happy 4th of July. Enjoy what liberties we have left as they are quickly being taken away from us by this evil administration which is in power.
Trident trikes has come out with a model which appears to be aimed at competing with TerraTrike’s Rover and Rambler models. The Trident Spike comes in 3 different models … Spike 1, Spike 2 and ESpike. The Spike 1 model is just under $1000. The Spike 2 model is just under $1300. The ESpike sells for just under $2500 which is by far the lowest cost electric motor pedal assist trike I am aware of.
Here is what Trident says about their Spike models:
“Product Description
Spike is a no compromise Sub $1k Folding Trike. Don’t let the price fool you though- Spike is packed full of features that you won’t see in other brands at twice the price. Our customers spoke and we listened. Not everyone is ready to commit $3,000 to their first Trike, but everyone wants something nice and easily upgradeable.
Some notable features of Spike include Trident’s exclusive Aluminum Seat that adjusts for both height– 14 5/8 Inches (370mm) to 16 1/2 ” (420 mm) and angle (42-52 degrees), a Folding Chro- Moly Powder Coated Frame, an Anodized Aluminum Boom, Aluminum Seat Frame with Water Bottle Cage attachment bracket, Shimano 7 Speed Deraileur/Shifter, Mechanical Disc Brakes, a Safety Flag and Alloy pedals- all STANDARD.
For those who want a Spike with better performance and components, Trident offers the upgraded 24 Speed Spike 2.
Spike 2 upgrades include a Truvativ Triple Crankset, Microshift Front Derailleur, Microshift Marvo LE Rear Derailleur, an 8 Speed 11-32 Cassette, and finally Avid BB5 Disc Brakes- all for the unbelievable price of $1299.00!!!
E Spike is a modified 8 Speed Spike 1- It uses an integrated system by a Japanese company called Dapu. It ifeatures a 350W Geared Hub Motor, a special Cranket with sensors, a 36V 13 AH Rack Mounted Battery with built in light, and a Digital Display. With this system you can choose between throttle only or 6 different levels of pedal assist.The 36v 13AH battery is much larger than other manufacturers use and will give you a much longer range- about 30 miles electric only and up to 75 miles using pedal assist. This entire package only adds 18.5 Lbs to a Spike!
An accessory kit with a full set of 3 fenders and a sturdy rear rack is available for $148.00
A Deluxe Accrssory Kit which includes 3 Fenders , Rear Rack, Accessory Mount, Rear Light and Mirror is available for $179.00
A Spike 21 Speed Upgrade kit is also available which includes a Truvativ 52/42/30 Crankset with 165mm Crankarms, a 3 Speed Shimano Revoshifter, a Microshift Front Derailleur, Cable Housing, and a Cable Noodle to go through the boom , This kit sells for $209.00
All Spikes have Direct Steering. It is only available in Silver. Spikes come 95% assembled and adjusted. They are not “kits” like many other brands of Trikes. All you have to do is put the seat on and adjust the boom length (and in some cases adjust the chain length).
Standard Boom length on all Spikes gives you an X- Seam range of 36 1/4” – 43 3/8”
Long Booms are available at no charge (exchange for your standard boom) which will give you an X Seam Range of 36 1/4 – 47 1/4 “
Here is the Spike
Here is the Spike folded
As you can see the seat must be removed in order to fold the trike. Although this is something I would much prefer not to be necessary at least this seat appears to be easier to remove and reinstall than some other trikes I have seen. The Spike 2 trikes come with Avid BB5 disc brakes which is what I started out with on my Catrike Trail. I hated them as they would not stay adjusted and were a real pain to adjust. I upgraded to Avid BB7 brakes and most of my daily headaches I experienced with the BB5s went away. I would do the same with this trike if I bought one.
Trident will sell and ship their trikes directly to the customer for $125 shipping charge. There are some Trident dealers around. I talked to one dealer recently here in Indiana. He told me that he could order the trike in and have it direct shipped to the customer for the same price ($125 and no sales tax) or sell it to the customer in the store where sales tax would be charged. Either way there is an advantage to buying it from/thru the dealer as then they will provide service and warranty work. This particular dealer even offers lifetime free adjustments. I assume that for those who buy directly from Trident they would work with customers who need warranty work and arrange such thru their dealers whenever possible, but this complicates and delays things so it just makes sense to deal with the dealer to begin with. Mind you I don’t know what all the dealers offer. I am only stating what this one dealer told me. You would need to check the particular dealer nearest you as to their offerings and charges.
As the product description says Trident ships their trikes out 95% assembled so upon arrival all that is needed is to install the seat and adjust the boom length to fit the rider which, of course, may or may not involve modifying the chain length. This makes it very nice for the customer as many trikes arrive and require a lot of assembly before they can be ridden.
I assume the toe in adjustment is properly set at the factory, but I would suggest checking it anyway to be sure it is correct. It is just a good idea. I received my Catrike from the dealer after they set it up and the toe in was one inch off. My front tires lasted only 30 miles before becoming completely worn out.
Here is the ESpike
The handlebars on the ESpike I find quite objectionable … awkward and ugly … a quite uncomfortable position to use. The trike looks fine otherwise, but those handlebars are ridiculous in my opinion. Among other things they put your hands right out in “harms way” as you ride along. I don’t know what the overall width between the handlebars is but it sure looks like they stick out far more than the wheel width. That’s crazy! This needs to be redesigned. I see no reason why they could not have handlebars that are further in and vertical vs. horizontal … handlebars which allow the arms to be down by one’s side instead of having to be held up and out like these do. The Spike 1 and 2 have normal handlebars like I am talking about.
With this trikes’s seat height and boom height one’s legs/feet are angled downhill instead of the more typical straight forward or slightly uphill angle found on most tadpole trikes.