Sooner or later it happens … the chain wears out and needs to be replaced. On a bicycle this happens much sooner mileage wise than it does on a tadpole trike. That is good news for the tadpole trike owner, but wait … there is bad news as well. The bad news is that a tadpole trike takes 2 to 3 times as much chain as a bicycle. Yeah, that’s bad news, but wait … there is good news in the midst of this. Because the chain is much longer it takes longer to wear out. “They” recommend replacing the chain on a bicycle every 2000 to 5000 miles. That is quite a variance, but the actual wear is dependent upon various factors such as rider weight, riding style, amount of shifting between gears, how the chain is maintained as far as lubrication and cleaning, etc. I have never read anything about how long a chain of a tadpole trike should last, but I got about 9,400 miles out of my first chain. I just recently replaced it again and this time I got about 12,400 miles out of it. I admit though that it was over due. There is danger and concern in continuing to run a chain which is worn out. A worn chain will wear out the sprockets prematurely. Normally the ratio between sprockets and chain replacement is 2:1. That is, you will go thru two chains before needing to replace the sprockets. And as far as sprocket replacement is concerned it may not be necessary to replace all the sprockets on the front if you don’t use one or more of them much. Many people just pretty much stay in the center chain ring (sprocket) so the smallest and largest sprockets may not need replacement when the middle one does. The rear sprockets (cassette) is sold as a set of sprockets normally so you most likely would have to replace all of them even if some aren’t worn much. By the way, I am talking about a machine with multiple sprockets front and back. If you have a different setup than this not all of this will apply.

Chains stretch as they wear and grow in length. Actually they don’t really stretch but we say they do. The side plates of the chain don’t change in length. What happens is that the metal wears off in the pins and rollers allowing the chain to become longer so we say it stretches. In the image above you can see worn pins vs. new pins. When a chain stretches it will wear the teeth of the sprockets quicker as it no longer “fits” them properly.

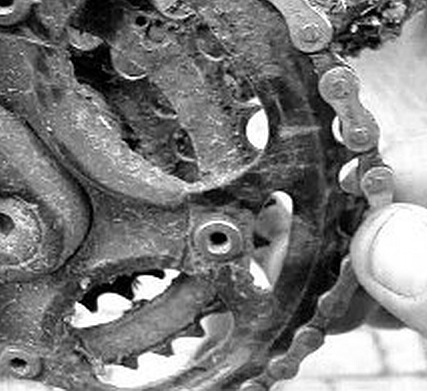
One quick test to determine chain wear is how it “fits” on the sprockets. It should be a snug fit and not able to move around much at all. Below is an image of a sprocket illustrating a worn chain. You can see how the chain no longer fits and can be easily pulled up off of the sprocket and moved about.


Standard bicycle chains measure one inch between the pins of the side plates of the chain. This is called the pitch of the chain. They make tools to measure chain wear, but you really don’t need one. All that is needed is to take a measurement between pins with the chain “stretched” tight so that all worn parts are as far apart as they will go and displaying whatever elongation has occurred. Place a tape measure or ruler on a pin and go 12 inches out onto the pin at that link. A new chain without any wear should measure exactly twelve inches. A worn chain will be longer. Anything more than a 1/16 of an inch past the 12 inch mark is worn too much and should be replaced. In the image above you can see that the elongation is more than a 1/16.
Because a chain stretches as it wears it is important that one doesn’t use the worn chain to determine the length of the new replacement chain. Instead one should count the links. Assuming you will be using new master links to connect the chain together you should count the existing master links in the old chain in the total link count. That is a lot of links to count, but a standard chain comes in 116 links. A chain on a tadpole trike takes 2 plus chains so you can safely eliminate counting 232 links, but remember to include the master link needed to connect the two sections. (Be sure that your new chain is 116 links. One person reported that the chain they bought was only 114 and this messed him up.) The overall length of the chain will be dependent upon two major factors … 1) the boom length and 2) the wheelbase of the trike. Of course, another factor in determining the correct length of the replacement chain is whether or not the chain being replaced was the correct length. If it was never set up correctly to begin with or if the boom has been adjusted in or out after the chain was installed then it might very well be off. That happened to me recently when I replaced my chain. I had extended my boom out just a little farther awhile back. When I counted the lengths and made my new chain the same as my old chain in link count I discovered it was too short when I installed it. I added two links and it was still too short so I had to add two more making a total of 4 additional links. Anyway, knowing you have 232 plus 1 master link totaling 233 you can simply count up to however many more links you need on the third chain before “breaking” it to length. Keep in mind the master link needed to connect the chain together. If you find you are coming out on the wrong place to break the chain it is usually best to go one more link longer rather than shorter. Technically a “link” is not what many think. A link is what many might consider two links. Here is an image demonstrating this:

For counting purposes to determine the length of the replacement chain I personally think it is easiest to count each section shown as “pitch”. You can do what you want but just don’t get “corn-fused”.
Determining whether or not the chain is the correct length is a matter of shifting between the various gear combinations. One needs to be careful when doing this as damage can be done if the chain is too short (which mine was). When you attempt shifting the chain onto the largest sprockets front and back you can run into big time trouble if the chain is too short. There are those who say you should never use this combination nor the combination of smallest in front to smallest in back. This is called “cross chaining” and many years ago this was a serious matter. With today’s chains it is no longer a concern. Also on a tadpole trike it really isn’t a concern anyway since the chain is so much longer than on a bicycle. It doesn’t really make much sense to use these gear combinations but if you do you system should handle it as long as everything is adjusted properly and the chain length is correct.

One thing I want to mention is that when adding or removing links in a chain and putting the chain back together using a chain breaking tool you need to be careful to push the pins back thru stopping in the right place … equally centered in both inside and outside plates. You may need to push the pin back from the opposite direction if it goes too far. If you fail to do this you might find yourself sitting alongside the road/trail with the chain “broken” at that link. I know this from personal experience. I carry a chain breaking tool and several inches of spare chain and master links so I can make a roadside repair if needed, but not everyone does. So be aware that this will leave you in a bad way if it happens to you.
Also, when adding or removing links in a chain you should check the chain at that link to be sure it moves freely and is not bound up. If it is too tight I recommend simply taking the chain holding and flexing it sideways from one side to the other to loosen up that pin in the link.
The final thing I want to mention concerning adding or removing links is that one needs to be careful when pushing a pin thru the side plates. It is important to get a “feel” for doing this as well as visually determining how far to push it. If you go too far and the pin comes all the way out of the far outside plate it makes it quite difficult to reassemble the chain as those pins are difficult to get back in place. If one does come out I usually use a pair of needle nose pliers to squeeze it back into the hole. I have found this to be about as easy of a way to accomplish it as anything I have tried. Just be sure the pin is going in straight.

The connecting link most common nowadays are called “missing link”. They are quick and easy to use to put the chain together, but when it comes to taking these connecting links back apart they can be a nightmare. I have struggled long and hard dealing with them. Personally I much prefer the old type master links with the retaining side clips, but they can no longer be used in today’s multiple speed sprockets. They make a special plier tool for this purpose. I modified a pair of pliers I already had, but I still find these links hard and frustrating to take back apart.

I mentioned the tool to use for taking these links back apart. Here is one popular one:

Another very handy tool I highly recommend is called a third hand chain tool:

It makes working on a chain so much easier and less frustrating. It is maddening to have your chain routed thru tubing, around sprockets, derailleurs and pulled together trying to put the connecting link in it when suddenly you lose one end of the chain and it takes off in retreat undoing all your hard work routing it. This tool will prevent this. You can make your own but these are not all that expensive and well worth buying.
As much as I like supporting local bike shops I sometimes purchase items online as I find so much better deals. For instance, the chain for my trike at a local bike shop cost $35 plus sales tax for each one. That’s $37.45 apiece. I found the exact same chain online for $15.40 apiece and free shipping. Guess which one I bought. 🙂
I hope this helps others in knowing about chain and sprocket wear and replacement.
KEEP ON TRIKIN’