CURRENTLY SOLD OUT/OUT OF STOCK

have heard it said that the whole world is on hold and back order. Definitely something has changed and it is not for the better. So many things I look up only to find words like “Currently Out of Stock” and usually followed by “we don’t know when this item will be ‘back in stock’/available”. Buying tires has really become challenging. Not only are things not available online but we often find the same thing to be true in our local stores.

This did not just simply happen. It was purposely caused. We can thank  President Trump that the situation is not much worse than it is as he took action to lessen what the DEEP STATE did to bring this about. So many people stubbornly refuse to accept and believe all the evil that is going on. It should not be that hard to accept it if one just pays attention and has an open mind to it. These people have come right out and told us what they are up to.

The Georgia Guidestones spelled it all out. What was found inscribed on the stones is the same thing the Illuminati  has disclosed at various times and places. The so called ** Vice President of the United States, Kamila Harris, recently said that we need to reduce the population. A slip of the tongue? Not what she was trying to say? No, what she said is the truth (for a change). Her and Biden seldom speak the truth. They are both just like their father, the devil, who is a liar.

** She is no more the V.P. than Joe Biden is the President since the 2020 election was stolen by the Deep State.  You don’t really think that a person who could not even get 50 people to attend his rallies actually won the election, do you? As far as I am concerned Donald Trump is still the President … the legitimate President.

Back to the Georgia Guidestones … From Wikipedia: “A message consisting of a set of ten guidelines or principles was engraved on the Georgia Guidestones. The inscriptions dealt with four main themes: “governance and the establishment of a world governmentpopulation and reproduction control, the environment and humankind’s relationship to nature, and spirituality.”[2]

The very first inscription read:

  1. Maintain humanity under 500,000,000.

They consider that to be a manageable number to control. To get the world’s population to 500,000,000 means eliminating 90 % of the present population … by death. That is why Covid 19 was released upon mankind … followed by the so called vaccine commonly referred by those who know what is going on as “the death jab“. They are working hard on bringing about a “one world government” otherwise known and referred to as “the new world order”. It even appears on the $! bill in Latin.

President Trump really messed up their plans and schedule setting them back several years from the progress they had made and had hoped to continue to make. That is why they had to steal the election and regain power. They are trying hard to stop Trump from regaining power as they know he will reverse everything they have managed to put into place and really mess them up again. All the charges they are accusing Trump of and trying to go after him for he is innocent of, but they themselves are very guilty of all of it. For those who find it too hard to believe that all of this is really going on be aware that this one world government is all part of end time bible prophecy.

You know the bottom line to all of this is simply … there is a God Who loves you and died for you to prove it. And there is a devil who hates you and is out to deceive you and keep you from the TRUTH. If you don’t believe there is a devil (Satan) then I say to you that he has already accomplished his work in your life. Jesus said of Himself … “I AM the Way, the Truth and the Life. No one can come to the Father unless he comes thru Me”.  (John 14:6)  Jesus, the One Who created you, truly loves you and wants to save you from the fate you and I deserve. (I am talking about hell.) Everyone of us has eternal life. It is our choice where we spend it. A FREE GIFT really does await you, but  like any gift offered you must reach out (respond to the one who is offering it) in order to receive it.

KEEP ON TRIKIN’

You are invited to come join the Tadpole Rider Facebook Group. Please note that in order to join you must first answer the three membership vetting questions.

FREE GIFT AWAITS YOU!

Why wish upon a star when you can talk to the  One (Jesus) Who created them?

TODAY IS THE OLDEST YOU’VE EVER BEEN, YET THE YOUNGEST YOU’LL EVER BE SO – ENJOY THIS DAY WHILE IT LASTS FOR THIS IS A DAY THE LORD HAS MADE! REJOICE AND BE GLAD IN IT!

“NORMAL” is not coming back … JESUS IS!

MOUNTING A KAYAK CANOPY ON A GREENSPEED MAGNUM SD

had a kayak canopy on my Catrike Trail. I found it much easier to mount on it than on the Greenspeed Magnum SD trike I have now. In short there is nothing toward the back of the trike to mount to other than the rear rack and it is too narrow to use. So I had to come up with something that would do the job. I don’t always use the canopy so I did not want whatever I put back there to be permanent sticking out like a sore thumb. That means it would have to be removeable. I thought about it and came up with an idea. I went to work on it first going to the hardware store and buying the material I needed to fabricate it. I started working on it and it came together nicely. I will be the first to admit that it is rather ugly and not what I would like to have back there. I could not find the sizes of PVC pipe I would have preferred to have. I probably ought to paint it black so it doesn’t stand out as much as the white does. Anyway, it is functional and mounts my canopy just fine.

Everything is easily and quickly removable except the largest diamter piece of PVC pipe which is 12 inches long and is fastened to the rear rack. The smallest diameter PVC pipe is the same pieces I used on my Catrike Trail. They are purposely angled backwards so that when the front of the canopy is unhooked it will raise up out of my way allowing me to get in and out of the seat normally.

Here is a closeup picture of what I put back there to do the job:

I can easily adjust the height of the canopy by raising or lowering the small diameter PVC pipe in the larger diameter PVC pipe. I like to have the canopy positioned just an inch or two above my head so that it provides maximum protection and shade.

The picture below is of my Catrike Trail and was taken before I put the V tie down on it.

Having to pull the canopy down to hook it provides tension on it so that it does better in the wind. It is quite stable. The front tie down is V shaped helping with stability as it does not allow the canopy to move back and forth sideways like a single  cord does. Also a single cord results in having it right in front where you are looking at it all the time which really bothered me. The V ties down eliminates this. This picture below is of my Catrike Trail.


I have an ARTICLE on my kayak canopy I posted when I first got it if you want to read it. It shows the detail of how I mounted it on the Catrike Trail. It was a lot less expensive to mount on the Catrike than it was the Greenspeed. HERE are all my posts concerning canopies. I really like having one on my trike when it is really hot and the sun is intense. It is nice having a shade tree along with you wherever you go.

Canopies offer limited protection from the rain. Having a wide canopy is nice as it will do a better job of blocking the sun off of you. The same is true of a long canopy which goes out over your legs. The drawback is it will also block your vision of a traffic light when you pull up at an intersection. I usually pull up at an angle so I can see the traffic light. I have also unhooked it so it rises up out of the way. I have the back of the canopy so it blocks the sun off of the back of my head, neck and shoulders which I really like.

Well, it is time to go riding although I don’t think I will both putting my canopy on today. It is certainly nice that I can if I want to. I am out of here.

KEEP ON TRIKIN’

FREE GIFT AWAITS YOU!

TODAY IS THE OLDEST YOU’VE EVER BEEN, YET THE YOUNGEST YOU’LL EVER BE SO – ENJOY THIS DAY WHILE IT LASTS FOR THIS IS A DAY THE LORD HAS MADE! REJOICE AND BE GLAD IN IT!

You are invited to come join the Tadpole Rider Facebook Group. Please note that in order to join you must first answer the three membership vetting questions.

“NORMAL” is not coming back … JESUS IS!

ADDING LOW COST E-ASSIST TO YOUR TRIKE

Anybody who has followed me thru the years know that I have had several e-motors on my trike over the years. I started out with BionX and then gave GoldenMotors a try. Then I went to eZee which I really liked. Next I tried Tongsheng which I had heard (read) such good things about but I found very disappointing. And now I have NBPower which I like quite well. In fact, I have a second brand new NBPower hub motor sitting on the floor next to me. I bought it as a spare at a better price than I paid for the first one. I have purposely steered clear of recommending e-motor conversion kits to others but I have been so pleased with this one that I have decided to recommend it.

Most hub motor kits I have found to be 135 mm width which may be a problem on some trikes. I have a Catrike and I had to spread my rear dropout slightly to get the second hub motor (GoldenMotors) to fit. Since then the eZee and NBPower  hub motors slide right into the dropouts okay. I am not advising anyone to spread apart the rear dropouts, especially if you trike is still under  frame warranty as it is likely to void the warranty.

I do want to disclose one important thing. This hub motor wheel comes with a 7 speed freewheel sprocket which means you must give up whatever your trike presently has … 9, 10 or 11 speed. It is a bummer, but not the end of the world. I bought and changed my 7 speed freewheel for different sprockets as I did not like the gearing that came on the hub motor wheel. You can order the 11-34 freewheel HERE. And, some say that a 9 speed chain won’t work with a 7 speed sprocket, but so far it is working well for me. I can’t say if your current setup is 10 or even 11 speed. And for what it is worth, I am not a fan of freewheels vs the newer cassettes. I have found them to be cheaply made and not hold up as well as cassettes.

I purchased it on Amazon. HERE is a link to it. The 20 inch wheel currently sells for $439. It does not come with a battery so that has to be ordered separately. I recommend a 72 volt battery if you can afford it. I already have 48 volt batteries so I am using them thus far. I hope to get a 72 volt someday and take advantage of the power offered by this motor. With 72 volts it should reach about 44 mph. With 48 volts my top speed is only about 23 mph on a fully charged battery.

Even settling for a 48 volt battery the total cost is about $800 to $900. That is a lot better than $2500 or even more many people are paying for Bosch and similar high dollar systems. And this thing is a rocket compared to the underpowered Bosch system like Catrike uses. You can spend more than a thousand dollars on some 72 volt batteries, but that is still more than $1000 cheaper than a Bosch system which will wear out your drive train much sooner adding to your operational expense as sprockets are not cheap nor is the new chain. Crank drive systems are notorious for wearing out drive trains prematurely. When I had the Tonsheng crank drive system installed on my trike it wore out (completely destroyed) my expensive TerraCycle idler pulleys in only about a month.

Yes, I am well pleased with this setup and so I am recommending it. The only thing negative I can speak of is it lacks torque sensing. It does have PAS sensing. I have a fairly recent article about PAS vs Torque Sensing  for those who are not familiar with the subject.

I will say this … the assembly and setup instructions supplied with the hub motor wheel kit leave something to be desired. That being said help can be found online. And I am willing to help in anyway I can. I had to look it up online to find what I needed to get the job accomplished. BTW, the PAS parts won’t install on the crankset of a Catrike. One must use a workaround in order to have a functioning PAS. There are different ways to accomplish this.

The kit comes with a hand throttle however unless specifically requested a twist throttle is provided vs. a thumb throttle. I personally much prefer a thumb throttle as a twist throttle is very tiring on the hand and wrist to use. So if you want a thumb throttle it is necessary to request one when the order is placed. (The seller is very helpful and will work with you on any issues you may have.) If they can’t furnish you will the thumb throttle you may have to order it separately. Make sure you get the one with the longer wiring as it has to reach from your handlebar to the controller which I assume you would mount somewhere behind the seat. You can order the thumb throttle HERE.

HERE is the setup instructions for the display console. Dealing with e-motors thru the years has been and continues to be a learning experience. One thing I learned is that when my trike did not have any speed or power upon completion of the installation it was because I did not have the PAS number selection turned up. It was on only 1 of 5 … actually 1 of 6 as it starts at 0 if I remember correctly. 0 is power to motor is turned off. 1 is the lowest power setting and 5 is the highest. So if you install this motor kit and find it doesn’t seem to have any power or speed (maybe 2 or 3 mph) be sure to check the PAS setting. You can readily change it using the 3 button switch. The middle button turns the power on or off. The left button turns the power (PAS) down until it reaches the lowest setting 0 (zero. The right hand button turns the power (PAS) up until it reaches 5 … it’s highest setting. The PAS number is located on the bottom left of the display console.

I have found that as with all “graph” type battery power level indicators it is not very accurate. I can ride about 60 % of the miles I normally get out of a full battery charge before it drops off of the full charge display. It has 5 bars that make up the battery power display.

The picture above is from when I had the eZee hub motor and its display console. I am posting it here so you can see the way (place) where the display console mounts.

If your trike does not already have a mounting bar for the display console to mount on you may need to purchase and install one. TerraCycle sells them. Actually what I use is a combination of the top part from TerraCycle and the bottom part (called a mirror mount) from Catrike. This is what you see in the picture above. You can buy it for either the left side or the right side. If you would want to mount the display console sideways you would not need the T part on top from TerraCycle. Or you might save money by jerry rigging something out of PVC or whatever.

I wrote about a 20 inch rear wheel but this kit is also available in 26 and 700 sizes for slightly more money. The size can be selected on the same page the link to the 20 inch goes tol

If you have any questions please feel free to contact me. I am always willing to help in any way that I can.

KEEP ON TRIKIN’

FREE GIFT AWAITS YOU!

You are invited to come join the Tadpole Rider Facebook Group. Please note that in order to join you must first answer the two membership vetting questions and agree to comply with the group rules.

BROKEN BATTERY MOUNT

My T-Cycle battery mount broke off yesterday spilling my battery onto the road. Fortunately the battery came to rest right on the painted line of the center turn lane and the traffic was stopped at a traffic light so I was able to retrieve the battery without it or myself getting ran over. It destroyed my plug that plugs into the battery. I tried for a long time to repair it but had no luck. That meant that I had a long ride home pedaling under my own power. And that means granny gear at 2 mph as that is all my body is capable of doing anymore as I have aged. I had to stop numerous times to rest. And the worst of it was I knew rain was coming and there was no way I was going to get home before that happened. So, by the time I did get home I was soaked to the bone as the light rain we had been having turned to a heavier rain. At least my phone stayed dry as I placed a plastic bag over it. This morning I went to work on my trike getting the electrical problems fixed so I can ride again using my motor. I just finished that. I am going to take a picture of the broken battery mount and send it to T-Cycle to see if they will cover it under warranty. If not I can weld it and continue to use it but I am leaning on making the pieces out of steel so it will be stronger. Since I installed the T-Cycle battery mount I have used rubber bungee cords on it to help take weight off of it and reduce metal fatigue hoping to prevent this. That is a lot of weight hanging out there to work at fatiguing that soft aluminum piece full of holes. Everything on the trike gets bounced around a lot and suffers serious jolts.
I am not an engineer, but I was a very experienced metal fabricator with over 60 years of experience. I have learned some things about metal and know about metal fatigue. Repair welding was my specialty. I have repaired tons of broken metal pieces … most of which failed due to being underbuilt. The T-Cycle battery mount is poorly engineered as it is weak where they have all the holes drilled and tapped. That is right where it broke, of course.  Most T-Cycle products are well made but I can’t say that about this one. If I remember correctly it is rated for 15 pounds. My battery weighs 14 pounds. I see on T-Cycle’s website that they have improved this battery mount for Catrike so maybe they have improved upon this weak point. I have written about T-Cycle’s battery mounts before. Click HERE to view it. And I have written an article on their other many fine products. Click HERE to view it. I have several of their products on my trike and with the exception of the battery mount I am well satisfied with their design and quality.
T-Cycle, if you are reading this my trike is a 2013 Catrike Trail.


KEEP ON TRIKIN’

FREE GIFT AWAITS YOU!

You are invited to come join the Tadpole Rider Facebook Group. Please note that in order to join you must first answer the two membership vetting questions and agree to comply with the group rules.

View insights
0 post reach
Like


Comment
Send

NOT A GOOD LOCATION FOR E-BATTERY

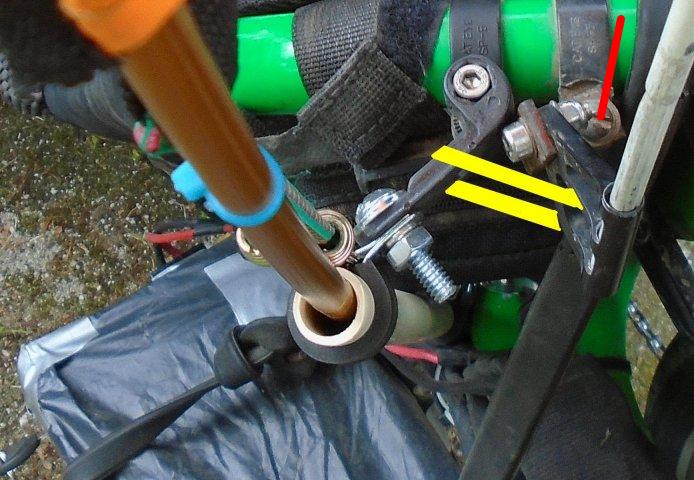
The picture above shows a common place to mount a battery. However there are pros and cons about mounting it here. The best pro I can think of is that it keeps the weight down low helping the center of gravity to remain low and thus help the trike to handle better and safer. Another pro is that the key is in easy reach from the seat. I like all of that but even so I am considering relocating the battery because of the biggest con. In this location the battery is subject to getting water and mud on it. In this picture above I wrapped the battery in plastic trying to keep it clean and dry. It definitely helped. I even taped around the plug in the front which is very susceptible to water and mud getting on and in the opening and on the electrical contacts. It gets so bad that the plug won’t plug in or if I can get it in it doesn’t make electrical contact and I have no power. I have to try to clean it out and up in order to use the battery. Like I said, placing the plastic on the battery did help but I didn’t leave it on there as it was not practical to have it on there. First of all it greatly interfered with plugging and unplugging the power cable. This is something I have to do frequently when I switch from one battery to another. I probably could come up with something else to help keep it clean and dry … like maybe a plastic bag of some kind. It definitely needs something. And I really don’t want to have to relocate it. You may have noticed the rubber tarp straps on the battery and wondered about them. The battery by itself weighs 14 pounds. That is a lot of weight sitting on the battery mount to constantly be working the aluminum metal  mount and fatigue it to where it breaks off at some point in the future. The tarp straps help hold the weight of the battery and take a lot of strain off of the aluminum mount in hopes that it never fails. It may not win any fashion contest but it works … it works great. Nope, this is not a good location for an e-battery as it is constantly getting mud and water flung all over it. My other battery is up above the rear wheel on a rack. That places the weight up high but it doesn’t get messed up like the lower battery does. It is always very clean and dry. Well, enough talk … it is time to ride boldly ride. Hope you manage to do the same.

KEEP ON TRIKIN’

A FREE GIFT awaits you!

You are invited to come join the Tadpole Rider Facebook Group. Please note that in order to join you must first answer the two membership vetting questions and agree to comply with the group rules.

MY CAMERA MOUNT

Every once in awhile someone asks about how to mount their camera. Here is what I did. The standard tripod for cameras is a 1/4-20 thread which screws into the camera. To mount my camera I used the tripod mount threaded hole in the bottom of the camera. I simply took an extra headlight mounting clamp and placed a 1/4-20 bolt thru it. It was easy to do and works great. Here are a couple of pictures of it.

The 1/4-20 bolt has its head ground down so that it doesn’t protrude down too far and interfere with the clamp as it is placed on the tubing it mounts to.

With this clamp mount I can mount most any camera. Aiming it straight forward it does catch my right foot as I pedal … something I don’t personally like to see in videos.

Below  is a video I filmed with this camera mounted as shown. I apologize for the in and out of focus going on. The camera has a feature which won’t stay turned off which automatically focuses on the face or whatever it perceives as its focal point. I turned it off before I started but it turned itself back on. I hate this camera. It is a Sony. I have a Samsung camera which I like much better but the screen display quit working on it.

KEEP ON TRIKIN’

FREE GIFT awaits you!

You are invited to come join the Tadpole Rider Facebook Group. Please note that in order to join you must first answer the two membership vetting questions and agree to comply with the group rules.


INDEPTH TOUR OF TERRA CYCLE

Matt Galat brings us this tour thru the Terra Cycle manufacturing facility. They make some great products such as mounts, holders, brackets, braces, etc. for our trikes.

KEEP ON TRIKIN’

FREE GIFT awaits you!

You are invited to come join the Tadpole Rider Facebook Group. Please note that in order to join you must first answer the two membership vetting questions and agree to comply with the group rules.


TERRACYCLE FLAG MOUNT

TerraCycle is well known for high quality products for us cyclists. Their flag holder (mount) is no exception. It is definitely more expensive than other flag holders I have seen ($38) but hey it is really well made and will definitely do a superb job of holding a flag pole. As you can see it is easy with this mount to adjust the angle forward to back of the flag pole (or even sideways if you have the mount positioned sideways on the trike).

It is available for both 1/4 inch and 6 mm flag poles. The mounting clamps are available in 1/2 thru 1 1/4 inch diameter or you can order it without any clamps. To order their flag pole mount click HERE

With these mounts the flag can be placed various places  … rear stays, seat frame … anywhere that will work for you. I highly recommend not having your flag pole positioned where people can get their eye poked out riding or walking into it. I see this all the time … flag poles that pose a serious threat of injury of others. Be considerate of others and think about what you are doing. Don’t be part of the problem. Wouldn’t you feel terrible if you were the cause of somebody losing their eye?

Personally I remove my two flags after each ride so I need a system which is easy and quick to do this. My Catrike flag pole holders work great for me but I had to come up with my own mounting system which wasn’t hard to do

If you have not come up with what works for you or if you want to possibly improve what you have consider these TerraCycle flag mounts.

KEEP ON TRIKIN’

A FREE GIFT awaits you!

T-CYCLE SEAT SIDE MOUNT KIT

Terra Cycle (not to be confused with TerraTrike) makes some great accessories for our trikes. One of them is their seat side mounting kits for a bag so we have a really convenient means of storing stuff nearby us with ready access to it. We can easily reach it while seated on the trike. Here is a video featuring this mounting kit illustrating how it mounts and works.

KEEP ON TRIKIN’

A FREE GIFT awaits you!

AN OUNCE OF PREVENTION STILL EQUALS …

I am sure most of us remember the saying “an ounce of prevention equals a pound of cure” … or … “is worth a pound of cure”. It proved true today while I was out on my daily ride. The small bolt (machine screw) which holds my flag pole holder onto the back of my seat frame broke off and everything went south. At least it tried to. Fortunately I have a plastic cable tie around the flag holder bracket securing it to another place nearby which does not allow the flag holder to fall down onto the ground. I also have my two flag poles connected together by a small elastic bungee cord which prevents the loss of a flag as I ride along. Between these two safeguards I didn’t lose anything. I replaced the broken bolt upon arriving back home and everything is good to go. I have lost various stuff before so taking these preventative measures have paid off.

In the picture below you can see the black bungee cord connecting the two flag poles together.

And here is the plastic cable tie (yellow) which saved the loss of the flag holder. The red line points to the bolt that broke.

Yep, an ounce of prevention still equals (is worth) a pound of cure.

KEEP ON TRIKIN’

FREE GIFT awaits you!

3D PRINTING … A HANDY GADGET

Over the last few years I have been seeing everything from a small part to an entire bicycle which was created by 3D printing. I don’t profess to know the first thing about 3D printing but as a metal fabricator most of my life I find it interesting and intriguing that various things I have always made out of metal can be made out of plastic and function quite well. I understand that the plastic used is quite inexpensive and is lightweight.

Here are some 3D printed mounts for taillights one tadpole rider has made for his tadpole trike:


Below is the mount made for the camera on a telescoping selfie stick.

Below is a water bottle holder.

As you can see all sorts of stuff can be made using a 3D printer. I would have to say however that for the average person it would not be all that practical to have such equipment. First of all it is expensive to buy so unless one would use it a lot it just would not be justifiable. And most of us probably would not be savvy enough to be able to use it. Lastly, most of us probably would not find ourselves needing to make all that much stuff for our trikes. What little we might have come up we can buy for a lot less than the 3D printer and supplies would cost. But for those interested and able it is an option.

May we all manage to …

KEEP ON TRIKIN’

FREE GIFT awaits you!